This document presents a number of exercises to learn the names of all the natural notes on the fretboard.
This is part 2 of 6 about learning the notes on the fretboard:
- Just 12 notes. (Background material)
- Open and E strings (this page)
- Practicing with actual songs
- Fret 5 and String 5
- Octave Shapes
- Whole Fretboard
Try not to be intimidated, but here is what we are eventually going to learn (this diagram is just for the first 15 frets, but you will learn your entire fretboard). You’ll eventually be able to find and name every single note in this diagram effortlessly:
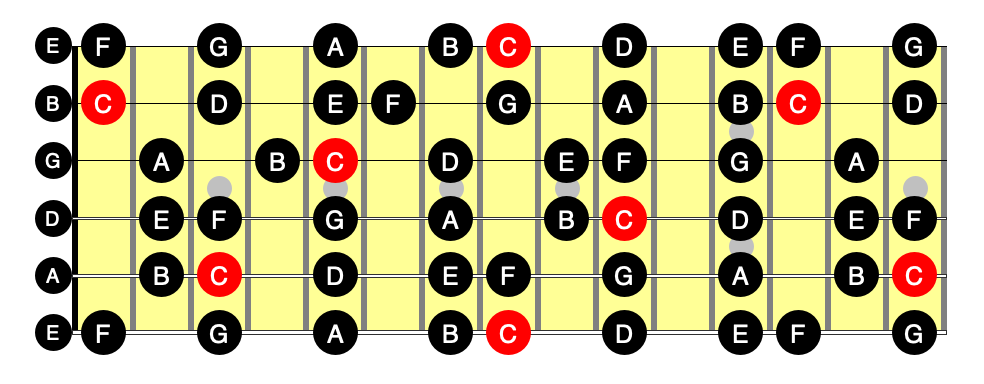
[If you’ve already learned the note locations, by the way, just take a moment to gaze at the ordered complexity of that diagram. Bask in the glory of how much you’ve already accomplished. The human brain is amazing. That’s quite an accomplishment to learn all that! Learning guitar is hard — it’s all too easy to despair. It’s important to take a moment periodically and rejoice at how much progress you’ve already made. A positive attitude really is important.]
Before you begin, be sure to tune your guitar every single time you attempt any of these exercises. These days there is no real excuse for not having some sort of electronic tuner (either a standalone piece of hardware or an app on your phone) but however you do it, be sure your strings are in standard tuning before you do anything else, even if you have to ask a friend to do it for you at first.
It’s important to begin training your brain to hear notes in tune. Every time you practice without tuning up, you risk programming your brain with bad information.
Fair warning
Even though this page barely scratches the surface of the subject (just one string!) it is not realistically possible to perform all of the exercises on this page completely in a single session (nor is it expected).
My intent with these exercises and drills is to give you a few ideas regarding how to practice. The exercises provide a glimpse into just how thoroughly you need to learn the simplest things. Music is all about profound complexity created from simple concepts — it’s nearly impossible to consider complex ideas if the simple stuff takes even trivial effort (especially when trying to keep a beat!).
Please read through this page (including all the exercises in their entirety) in a single session, before even picking up the guitar. Then decide which of the exercises you have the energy to attempt on the first day (and how thoroughly). You are expected to come back to this stuff in subsequent practice sessions, even after you’ve moved onto other things.
Realize, however, that merely reading an exercise is very different from performing it.
The intent is for you to pick and choose from the exercises/drills that seem most useful to you at the moment, then come back to the remainder in subsequent practice session as you feel the need.
I’ve given little indication of how long each exercise should take, how thoroughly you should attempt it, or how many times you should repeat it before moving on.
Only you will know how much time and energy you have to spend in a session. Only you will know when you’ve truly mastered an exercise. Whether this takes 20 minutes (beyond unlikely) or months (slightly less unlikely) depends on the individual.
Open strings
We number the strings starting from 1, the thinnest string closest to the floor, to 6, the thickest closest to your chin.
Terminology can get confusing, so this site always uses terms like “up,” “down,” “higher,” “lower,” etc. relative to pitch and not relative to physical topology.
That is, the 6th string is lower than the 1st string, even though it’s physically farther from the floor. Similarly, a note played at the 5th fret is “lower down the neck” than one played at the 12th fret of the same string. This is true even though proper form has one holding the headstock physically higher than the bridge of the instrument. To play on a lower string means to move your hand further from the floor. To play higher up the neck moves your left hand closer to your right.
From low to high (6th to 1st strings) the strings are tuned to the notes E, A, D, G, B, and E. You simply have to memorize this, there is no shortcut. The E produced by the open 1st string is two octaves higher than the one produced on the open 6th string.
Exercise 1: Open Strings (click to expand)
Pluck each string in order, 6, then 5, ..., up to the 1st string, saying the corresponding note name for each string out loud. Repeat this multiple times until you are completely confident you've got it memorized. It's important to say the note name out loud, it truly helps your brain to make the connection. This may seem foolishly easy, but things will get much harder quickly — every second spent ensuring the easy stuff is truly effortless is invaluable.
Now try it going in the other direction, plucking 1, then 2, 3, 4, 5, and finally 6 this time. You may discover you don't know the names as well as you thought. Going backwards can sometimes be surprisingly difficult.
Next, try every other string: 6 4 5 3 4 2 3 1. Then the other direction: 1 3 2 4 3 5 4 6. Again, be sure to say the note name out loud.
Now try a couple different patterns:
- Sequences of 3 up: 6 5 4, 5 4 3, 4 3 2, 3 2 1, and down: 1 2 3, 2 3 4, 3 4 5, 4 5 6.
- Every other string: 6 4, 5 3, 4 2, 3 1, then 1 3, 2 4, 3 5, 4 6.
Out loud, every time.
You probably think this is overkill by now, and that no further drilling is required. Well, there is no better way to prove it to yourself than with a metronome. Try setting a metronome to a slow tempo, say 60 BPM, then repeating the previous sequences with one pluck on each beat. Quickly mute each note after you play it, but still say the note names out loud. If you're at all human, you've probably discovered you didn't know the notes quite as well as you thought.
60 BPM is now easy? Make it harder again by gradually increasing the tempo. Once you can perform the exercise at, say, 100 BPM you can be confident that you truly KNOW the open string notes.
Make sure you practice thinking in both directions, too: from string to name, and from note name to string. That is, sometimes practice plucking a string at random, then naming the note. Other times say a note from EADGBE at random, then pluck the corresponding string.
It may seem like incredible overkill to go through all this for something you probably felt you had memorized after reading it once, but trust me that the rigor is worth it.
Exercise 2: Notes at the 12th fret (click to expand)
Here's our first free bonus! The notes at the 12th fret are exactly the same as the open strings:
All the notes repeat starting at the 12th fret. Notes at the 12th fret are the same as those at the 0 fret (open strings). Notes at the 13th fret are the same as those at the first fret, and so on.
Repeat Exercise 1, but this time use both open strings and the repeated notes at the 12th fret. That is, pluck open 6, open 5, ... open 1, then back down the strings at the 12th fret: 1st string 12th fret, 2nd string 12th fret, and so on. Naming the notes as you go. Then go in the other direction (up the strings at fret 12, down the open strings). Then go through the sequences in both locations and both directions. Check yourself with a metronome.
Do it!
Keep drilling until you have absolutely no “mental friction” or delays. Most people KNOW the open notes within a single practice session, but don’t hesitate to take as long as necessary.
You may think some of these exercises are completely unnecessary, and you may even be right, but it’s an extremely bad habit to think you can perform something on the guitar without actually doing it. You may be surprised. You’re also programming your brain by associating sounds and fretting locations with note names. Lastly, it’s important to spend at least a little time practicing things you can do easily. It’s easy to become demotivated if you only practice things you can’t do! (Within moderation, of course, once you can perform an exercise effortlessly, it’s time to move on.)
Exercise 3: Reciting the C Major scale (click to expand)
This is an exercise that doesn't even require a guitar.
As stupid as it sounds, the drill is to practice saying the note names in order, out loud. Say "C" then "D" then "E" then "F" then "G" then "A" then "B" then repeat the sequence. Get used to going from G to A (there is no note H, so you’ve got to get your brain used to “rolling around” every time you get to G). "C D E F G A B C D E F G A B ...."
Next spend a minute or two starting on random notes: BCDEFGAB, then EFGABCDE, then GABCDEFG, etc. Do it! You need to KNOW that the note after G is A (every bit as well as you know that the note after A is B!)
Now we are going to make it a little harder. It’s not enough to know the notes forward, you must also KNOW them backwards! Practice, out loud, reciting the notes in reverse order (rolling back from A down to G in this case).
You’ll find this a little strange at first, we aren’t used to reciting the alphabet backwards but musicians need to know scales and notes forward, backward, and in arbitrary order! Again, practice starting on any random note and recite the notes backwards: CBAGFEDC, GFEDCBAG, AGFEDCBA, etc.
Do this until it feels natural and automatic, with no thought required. Set a timer and practice going backwards for at least five full minutes. Keep drilling daily until it's as automatic reciting the note that comes before A as it is reciting the note that comes after C.
Do it! No matter how stupid you feel.
Natural notes on the sixth string
Now that you’ve got the open strings (and 12th fret) down, let’s learn the seven natural notes on string six.
First, let’s explain what we mean by “natural notes”. Like many things with music theory, it’s often easier to see things on a piano keyboard than a guitar’s fretboard. Here’s a diagram of a grand piano:

A grand piano has 88 keys: 52 white ones and 36 black. As you likely already know, the pitches produced by each key get higher as you move further to the right.
On a piano, the white keys are the “natural notes.” Although there are physically 52 white keys on a grand piano, there are really only 12 natural notes repeated multiple times:

Notice that there are 8 keys labeled “C,” for example. The red one in the middle is called “middle C,” surprisingly enough.
[It’s worth knowing that a grand piano can produce more pitches than a six-string guitar. It produces pitches both lower and higher.]
Each of the black keys has two names (technically, even more, but we’ll ignore double flats and double sharps for now). The black key that lies between each C and D key, for example can be called “C♯” (“C sharp”) or “D♭” (“D flat”). The black key between each G and A can similarly be called G♯ or A♭.
The natural notes are named with the first seven letters of the alphabet: A through G.
There are only seven notes in each “octave,” then the pattern begins again. The leftmost white key produces the note A, and every eighth white key to its right is also an A.
If you look carefully, you’ll see that there are seven white keys (natural notes) and five black keys (sharps and flats) for a total of twelve notes in every octave. This is true regardless of which note you start the octave on (A to A, B to B, …, or G to G). In all of western music, there are only twelve notes!
Notice the pattern of the black keys.
For reasons we’ll get into later, it’s most useful to look at octaves that begin on the note C. If you play twelve consecutive keys (white or black) starting with any C, you’ll end up on the note B.
Most importantly, there was a black key between every pair of white keys, except between B & C, and between E & F. Remember this! This fact that two pairs of natural notes are separated by a smaller interval than the rest is the foundation of “diatonic harmony” (and, indeed, all western music).
B/C and E/F which are separated by a “semitone” (no intervening black key). All the rest are separated by a “whole tone” (two semitones: a white and a black key). You simply must remember this.
Okay, back to the guitar.
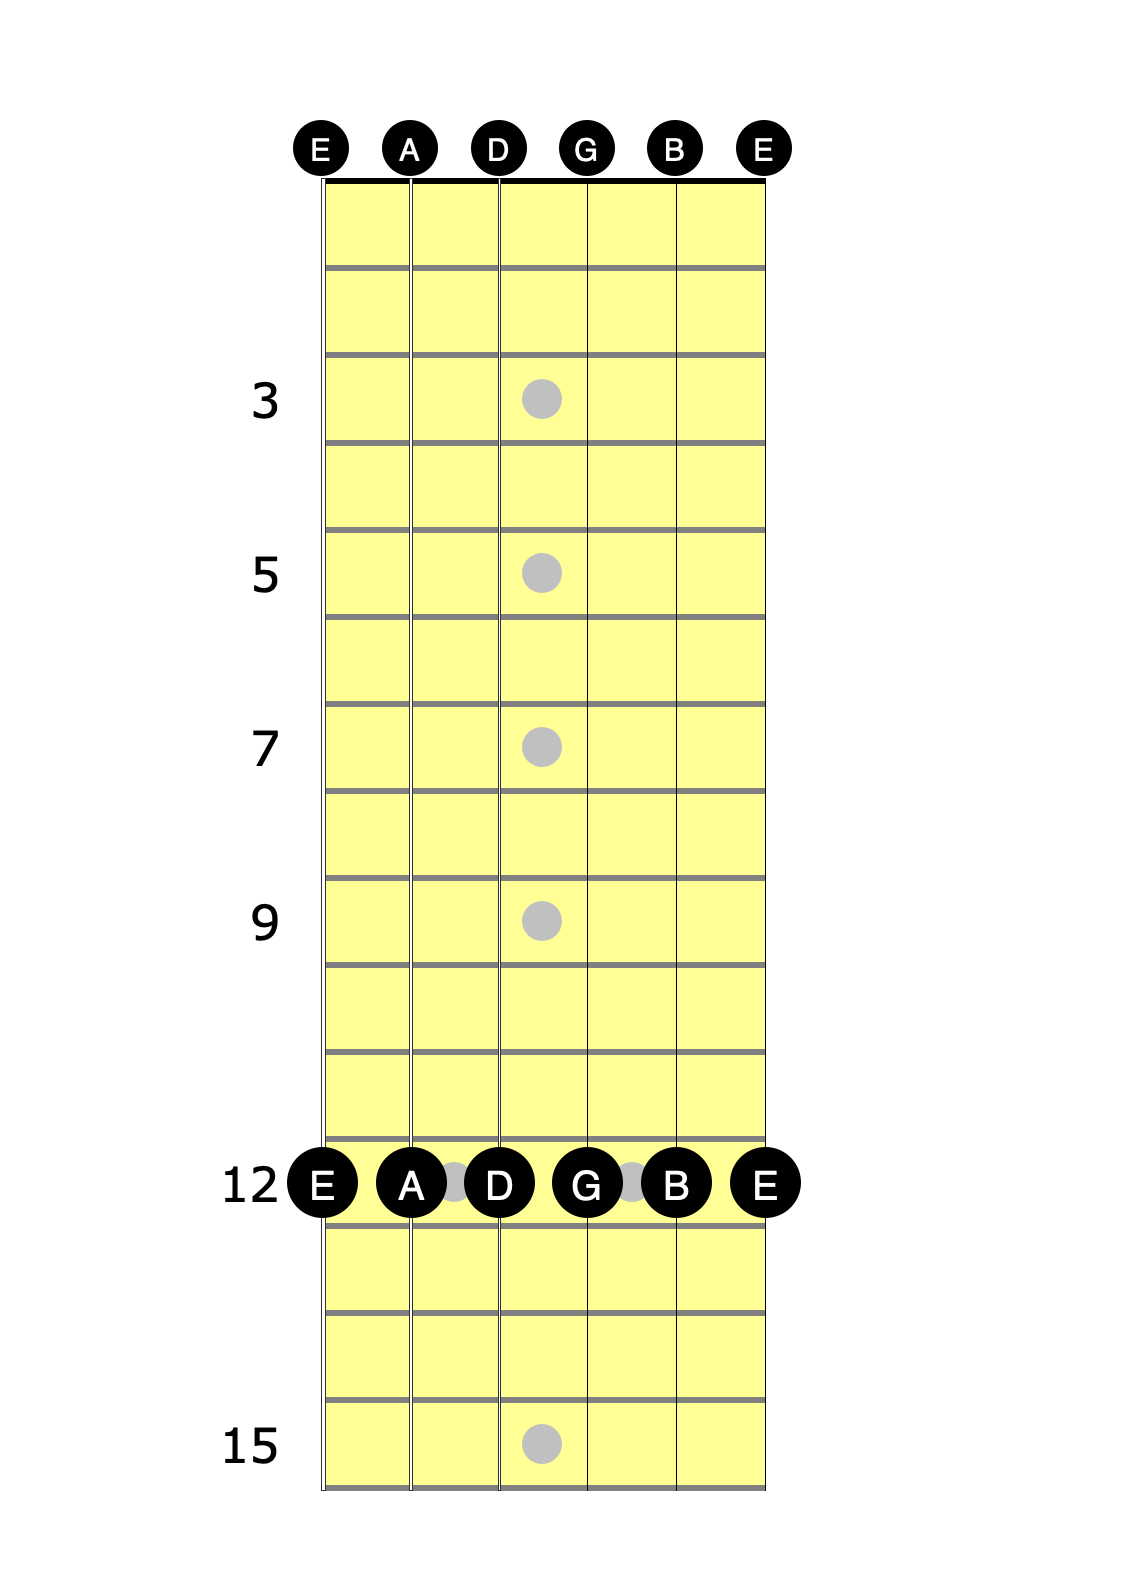
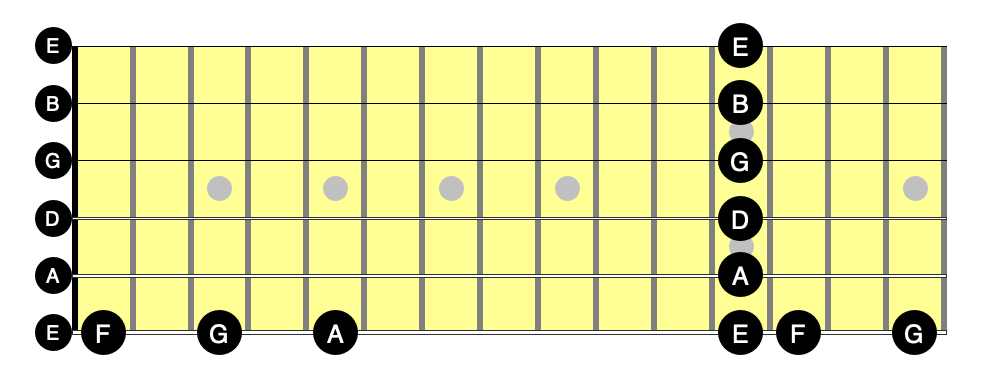
Here are the natural notes on the sixth string of a guitar:

These are the same seven notes as the white keys on a piano.
[The red C on the fretboard is notated on sheet music for guitar as “middle C”, but produces a pitch exactly one octave lower than middle C played on a piano. This can be a little confusing, but it makes reading music for guitar a whole lot easier. Without this convention, almost everything you might play would have to be notated with ledger lines.]
We’re going to work our way up to memorizing all of these notes incrementally in this section. (Even if this looks somewhat intimidating, it shouldn’t take you more than one practice session to KNOW (or at least almost KNOW) these notes.
Before we tackle learning the notes between the two we already know (the E’s on the open string and fret 12) examine the spacing between each of the labeled notes (the natural notes).
Exactly the same as a piano, almost all the notes have two frets (a “whole tone”) between them. The only exceptions are between note E and F, and between B and C (with only one fret, a semitone or “half step,” between these pairs of notes).
The seven natural notes A-G are also known as the C Major scale or “C Ionian” (which is why the C notes in the diagram are red — C is the root note of the corresponding scale).
If we start from the root C, the pattern of whole steps and half steps is W W h W W W h before we get back to the root again. That is, C to D is a whole step (W), D to E another whole step (W), E to F is only a half step (h), then back to a whole step from F to G, etc.
The diagram stops at fret 15, but the pattern continues indefinitely. Imagine that the diagram is infinitely long, or that fret 15 wraps back onto fret 3.
Exercise 4: Major Scale Intervals (click to expand)
Memorize this pattern: Whole, whole, half, whole, whole, whole, half.
Recite the "whole whole half whole whole whole half" sequence until you can repeat it in your sleep. All of western music derives from this one pattern! Literally recite the sequence out loud several times ("whole whole half whole whole whole half whole whole half ...")
For the natural notes, the pattern starts with C: C (W) D (W) E (h) F (W) G (W) A (W) B (h) C .... This is the C Major scale. There is a whole step between every pair of notes except B/C and E/F. Remember this!
What's the interval between A and B? Between E and F? Between G and A? Between B and C? Between D and E?
Now consider progressing backwards, down the scale. What is the interval from D down to C? From F down to E? From A down to G?
Practice saying any random note from the seven and answering how large the interval is up and down to the adjacent notes.
Now make it harder and think about the intervals between non-adjacent notes. An interval of two whole steps is called a "major third." The interval of one and a half whole steps (three frets) is called a "minor third." What are the intervals between these pairs of notes:
- A up to C?
- G down to E?
- F up to A?
- E down to C?
- F down to D?
Try to answer all of these questions in your head, without looking at the diagram.
The note A at fret 5
Back to learning the notes on string 6. Let’s first tackle the note “A” on the fifth fret.
Like the open string and the 12th fret (where things repeat) the fifth fret is a good “landmark” for learning the remaining notes for several reasons:
-
The fifth fret is almost halfway between the nut and the 12th fret. No matter where your hand is, you’re going to be close to the nut, the 5th fret, or the 12th fret. If you KNOW the notes at these locations, figuring out the rest is easier until you KNOW them as well.
-
The A note at the fifth fret is the same as the open 5th string note. The interval from E up to A is known as an interval of a “perfect fourth” (because it’s four scale notes between E and A inclusive: EFGA — four notes). A guitar in standard tuning has the strings tuned in fourths (with one exception that we’ll get to later). E to A is a fourth. A to D is a fourth. D to G is a fourth. B to E is a fourth. Being able to find fourths along a string as well as between string pairs is extremely useful as we’ll see.
-
Because the guitar is (mostly) tuned in fourths, the notes at the fifth fret can be used to tune the next higher string. One way to tune the open 5th string (the note A) by ear is to play the 6th string at the 5th fret, then twist the tuning knob on the 5th string until it produces the same note. [I’ll cover more tuning tricks and patterns in a separate blog post.]
Exercise 5: Twe E's and A on string 6 (click to expand)
Fret the 6th string at the fifth fret, sound the note, and say “A” out loud. Do this for open E, 12th fret E, and 5th fret A over and over until it’s deeply ingrained in your muscle memory. Drill in random order: high E, A, low E, A, low E, high E, ….
Drill in both directions: say a note name and find the fret, as well as fretting the note first, then saying the name. Do it until you can’t stand it any more. Do it with intent and “mindfulness” as the hippies say.
Note that the pattern repeats above the 12th fret: there is another A five frets above the 12th fret E at fret 17 (if you can reach it on your guitar).
Pluck the note at the fifth fret of string 6, then the open 5th string. Hopefully your ears will tell you that these are exactly the same note, and your brain will tell you that they are both A's.
Make up patterns through the 14 notes you've already learned (open strings, 12th fret, A's at fret 5 and 17). Say, up the open strings, down the 12th fret, high A then low A. Plus the reverse direction. Practice sequences of three or every other note through the patterns with a metronome.
You now KNOW three of seven natural notes on the first string! It should take no effort whatsoever to find these notes on the sixth string given the note name, nor to play any of these notes and name them.
Adding F and G
What note comes after E? (F, of course, just a half step up from E).
What note comes before A? (That would be G, down a whole step or two frets.)
If answering either of those questions took even a moment’s hesitation, you should go back and repeat some of the earlier drills. Things get harder as we go forward. The more you solidify the easy stuff in your head, the easier things will go later. Baby steps. Do not feel obligated to complete this entire lesson in a day — take as long as you need.
Exercise 6: E, F, G, and A on string 6 (click to expand)
Slowly play and say these five notes: E on the open string, F at the first fret, G at the third fret, and A at the fifth fret. Repeat multiple times, going through the notes in order (EFGAE, then back to the open string E, then FGAE). Say the note names out loud. Repeat several times. You are programming your brain and muscles to associate these notes and these sounds with these locations.
Play as many of the E, F, G, and A notes as you can reach easily. Just knowing that the pattern repeats isn't the same as practicing with your hands and hearing the sounds with your ear!
Next, repeat the exercise, but go backwards from the highest note you can reach (say E at fret 12, then AGFE, then back to fret 12, EAGFE, …). Now do it in random order. Continue drilling until you feel like you can do it in your sleep. Use the diagram if you need to, but you’ll quickly realize you don’t need it. Say the note names out loud.
Make up patterns through all 18 notes you've already learned (open strings, 12th fret, low FGA, high FGA). Again, one pattern might be up the open strings, down the 12th fret, high A then low A. Practice the reverse directions too. Practice sequences of three or every other note through the patterns with a metronome.
You should now KNOW four of the seven natural notes on the sixth string (though it may take several days or even weeks for it to completely stick). If someone says “G” you should immediately, with no hesitation, visualize your left hand hovering over the third fret. Same thing for the other three notes (or any of the open string notes).
Do not move onto other exercises until you are 100% comfortable that you KNOW these 18 note locations.
It’s not a race. Nor is it like learning things in elementary school where you could stop drilling once you could reliably come up with the right answer (eventually). It’s closer to exercising, or practicing your golf swing: no matter how well you know it, you can always get better and you never stop practicing. You want it to become absolutely automatic muscle memory where no conscious thought is required. It takes way more practice than you might realize!
Pilotage vs. dead reckoning
We’ve spent an awful lot of time already just drilling with a few note locations. The reason is that these will become your guideposts or landmarks for finding other notes.
It’s like learning your way around a new city. At first you may only know a few landmarks (say your favorite coffee shop, your apartment, and where you work). If someone asks to meet you at any of these locations, you don’t need any further directions: you know exactly where to go. This is pilotage.
Dead reckoning is when you use tools like a a compass and some way to measure distances to navigate from a known location. It’s the difference between “meet me at Starbucks” and “take the third left down the street from Starbucks, and meet me at the brown building on the right at the end of the block.”
Eventually, we want to know all the natural notes everywhere on the neck by pilotage. We want to just know where they are without much thought. This will take quite a while, though. We’ll use dead reckoning in the interim and just find notes relative to ones we already KNOW. But you simply must KNOW at least a few landmarks to get started.
This is why it’s so important to drill excessively on these first four notes. The more notes you just KNOW, the easier the directions and faster the navigation to every place else.
The remaining three notes: B, C, and D.
Now that you can pilot to four notes on the 6th string that you truly KNOW, let’s use relative thinking (dead reckoning) to find the remaining three.
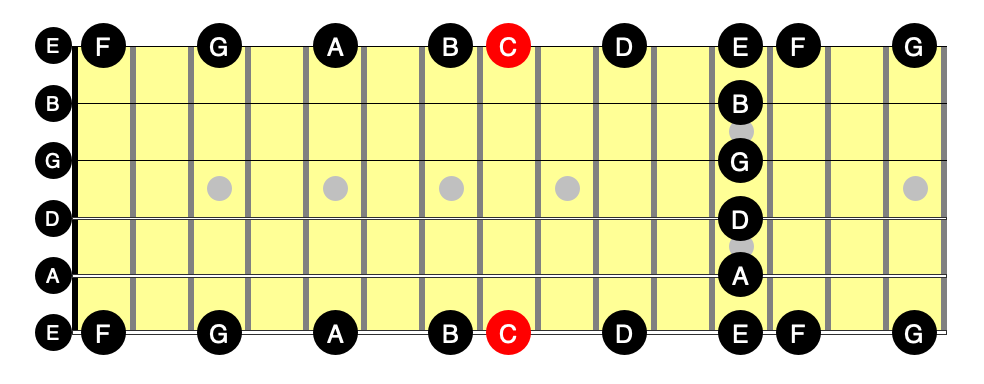
Here’s the diagram for string 6 again:
Because you already practiced learning the intervals in the major scale, B and D are trivial: B is up a whole step (two frets) from A, and D is down a whole step down from E.
(Now you see why we spent time with that silly exercise of saying the notes in the C Major scale backward.)
Once you truly KNOW B and D (and can pilot to them) it’s easy to find C by dead reckoning: another half step (one fret) up from B, or a whole step down from D. Until then, you may have to follow two step directions to find it (e.g. “Find B a whole step up from A, then go up another half step”). Pretty soon, though, you should be able to start thinking in single steps (“C is a minor third, or three frets up from A”). Eventually, you’ll truly KNOW at least one and hopefully all of these three notes.
Exercise 7: All the natural notes on string 6 (click to expand)
Practice going through all seven notes in order (EFGABCDE) through the highest fret you can reach, forward and backward (EDBAGFE).
Next practice finding and saying the notes in random order (e.g.: BeDC AeBA GFAE FAeF GeCG EDGE EAG DeAE). Actually play and say the notes **out loud**. Find some sheet music or chord charts online to find sequences of notes to practice (just ignore sharps and flats).
The Real Book is a good source of song charts, as is archive.org in general. If you know how to read notes you can use the melody lines, but even if not, the chord sequences help will give you sequences you can use. Just play the root of the chord, the first letter in the chord name, and ignore any sharps or flats. For "slash chords" showing notes in the bass of a chord, you can choose to play them or ignore them. The Mike Stern song on page 7, for example, shows the chords G/A F#/A Bm7 Em D A/C# in the first few measures, so you might play G A F A B E D A C.
As always, also practice going from location to note name, and not just name to location. That is, randomly fret one of the locations that you know and then say the note name out loud.
Next, try to pick out some simple melodies by ear using those notes (ideally ones in the key of C Major or A minor so there aren't any sharp or flat notes). Christmas carols are good for this. See if you can work out the beginning of Jingle Bells by ear starting with E at the 12th fret. If you've got an electric guitar, see if you can play the start of "Somewhere Over the Rainbow" starting with the C at the 8th fret (you'll likely run out of frets on an acoustic).
Finally, find a backing track on YouTube that's in the key of C Major or A Minor, and randomly play these notes over it (still saying the note names out loud). The goal is to train your ear so that when you accidentally play a wrong note (a sharp or a flat note) you can hear it immediately.
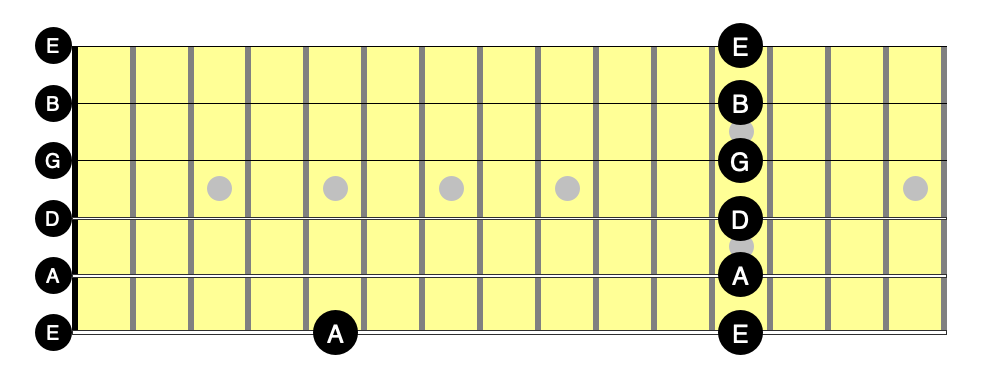
Free bonus #2!
As you have learned, the top and bottom strings on the guitar are tuned to the same note, but two octaves apart.
This means that everything you’ve learned on string 6 is immediately applicable to the high E string as well. By the time you get here, you will be well on your way to KNOWING over one third of the natural notes on the fretboard!
Exercise 8: Pattern sequences to practice (click to expand)
Practice finding all the A's you already KNOW (you know four of them if you can reach the 17th fret). Then find all the B's, then the C's, and so on, all the way up to G.
You'll probably find it pretty easy to find each note sequentially, because each subsequent note is close to one you just found. So mix it up a bit. Make it harder. Find sources for other sequences of notes (or just make random strings of them).
The following two sequences are particularly useful:
Mostly-Fourths: B E A D G C F B E A D G C F B E A .... Try not to always start on a different note, not always with B, but always follow the same order. [I call this sequence "mostly fourths" because it skips over any sharp/flat notes: a fourth up from F is Bb, not B (F to B is a M3). We are focusing on learning the natural notes in these exercises. It's okay to use dead reckoning from an adjacent natural note to find the sharps and flats.]
Thirds: C E G, B D F, A C E, G B D, F A C, E G B, D F A. Repeat.
The mostly-fourths sequence of natural notes is BEADGCF. Practice saying it out loud in order, over and over. Memorize the sequence using whatever mnemonic tricks work, but try to use that sequence for practicing as often as possible — it's far better than alphabetic order. I remember the sequence as the word "bead" followed by the initialism for "greatest common factor" (GCF). Meaningless, but it works for me. It also contains the order of the open strings (except, of course, for the B string).
You should know that the full "cycle of fourths" goes through all 12 notes, not just the seven natural notes. The full cycle of fourths is B E A D G C F B♭ E♭ A♭ D♭ G♭, then it starts over again with B.
Just like you needed to learn the alphabet backwards (GFEDCBA) you should practice the "mostly fourths" sequence backward, too: FCGDAEB. When you go backward like this, you are actually going in intervals of a perfect fifth (no longer fourths). Knowing this sequence is particularly handy when reading sheet music.
The thirds sequence is FACEGBDF. Memorize this, too. Practice saying it in order. Then practice saying it in strings of three: C E G, B D F, A C E, G B D, F A C, E G B, D F A, then starting over with C E G. Each group of three notes is called a triad. You'll be spending a lot of time with them in the future, but for now just use them as a source for patterns.
If you've ever learned how to read music on a treble clef in sheet music, these sequences should look familiar. FACE (the word "face") are the notes on the open spaces between the lines of the clef. EGBDF ("every good boy does fine") are the notes on each line. It will prove incredibly valuable later to know the three notes in each three-note triad, so try to practice this way as often as possible.
Using these sequences during your practice sessions is a great way to kill two birds with one stone. You're memorizing two important sequences, as well as mixing up the order of whatever you're practicing.
Whenever you think you've got these sequences nailed, be sure to test yourself with a metronome to keep yourself honest. If you can't find/name the notes in time then you don't know them well enough
Next up is an optional but fun way of practicing your notes on the sixth string using actual songs.