This is part 5 of 6 pages dedicated to learning the notes on the fretboard:
- Just 12 notes. (Background material)
- Open and E strings
- Practicing with actual songs
- Fret 5 and String 5
- Octave Shapes (this page)
- Whole Fretboard
Here’s the complete diagram of the fretboard again:
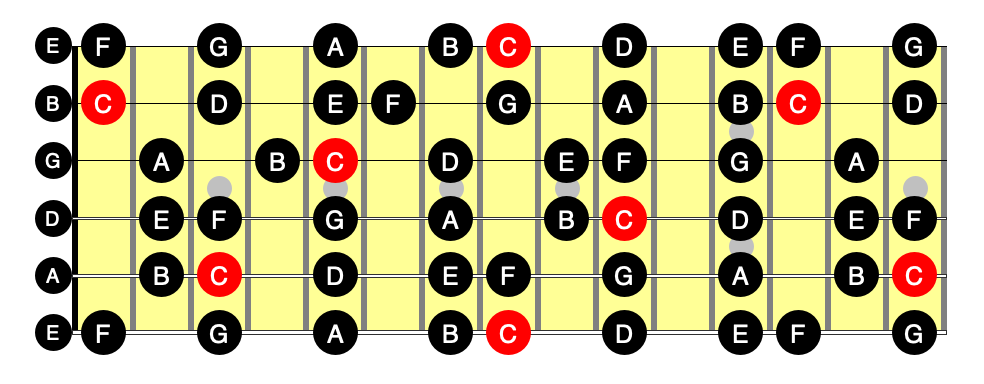
Hopefully it looks a little less intimidating than the first time you saw it.
Now that you already KNOW a bunch of landmarks, it’s time to learn a neat little navigational trick called octave shapes to help you (quickly) find the remaining notes by dead reckoning from those landmarks.
Octave shapes are an incredibly useful tool, requiring memorization of only a few simple shapes. But they are still just a tool. Think of them like a compass to help you navigate from landmarks you already know. Eventually, we still want to be able to pilot to any note on the fretboard without navigational tools or directions, we want every natural note to be a landmark.
Truly KNOWING all the notes can take years, though. In the interim, this tool can help make dead reckoning easier and faster than counting several frets from open strings or the fifth/twelfth frets.
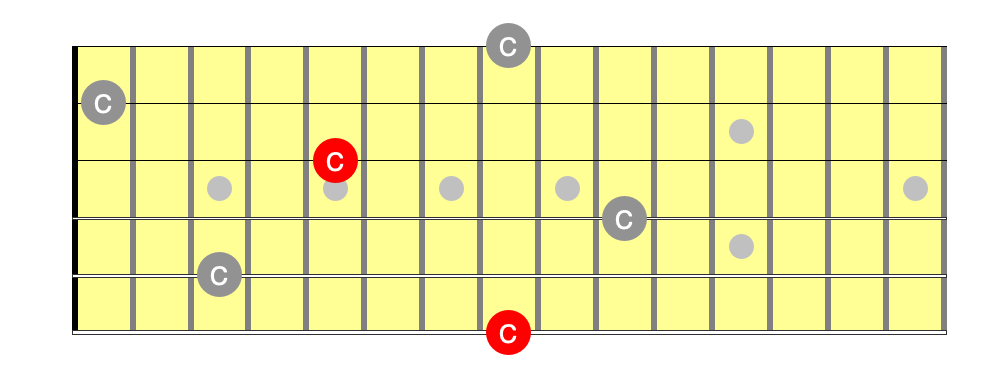
Let’s channel our inner Marie Kondo and de-clutter a bit. The root or tonic of the C Major scale brings me joy, so let’s focus on that note first:
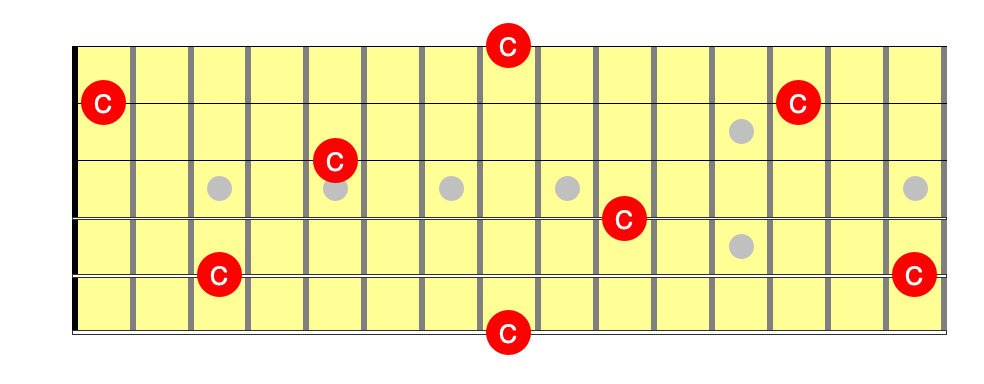
It should be obvious if you think about it, but the note C exists in only one location on each string between frets 1 and 12.
We already know how to find the C’s by counting up or down from notes we already know on the same string, but there’s another way: using patterns that go across strings.
Octave shape 1
Here’s our first octave shape:
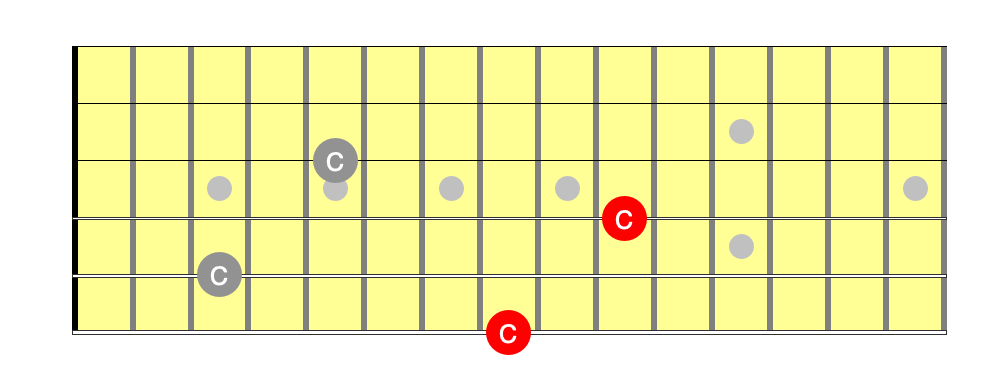
If we already KNOW a note on string 6, we can find the same note on string 4 with a little zig-zag: two strings higher and two frets higher. The C at fret 8 on the the E string leads us to the C at the 10th fret of the D string.
The same thing works on the 5th string (the grey notes): We KNOW that C is on the 3rd fret of the A string, so we can navigate (dead reckon) to the C at the 5th fret of the G string. (Of course, you should already KNOW that note since it’s on the fifth fret, but it’s nice to have confirmation.)
What about the higher strings? Let’s look at the octave shapes between the G and high-E strings, and between the D and B strings.
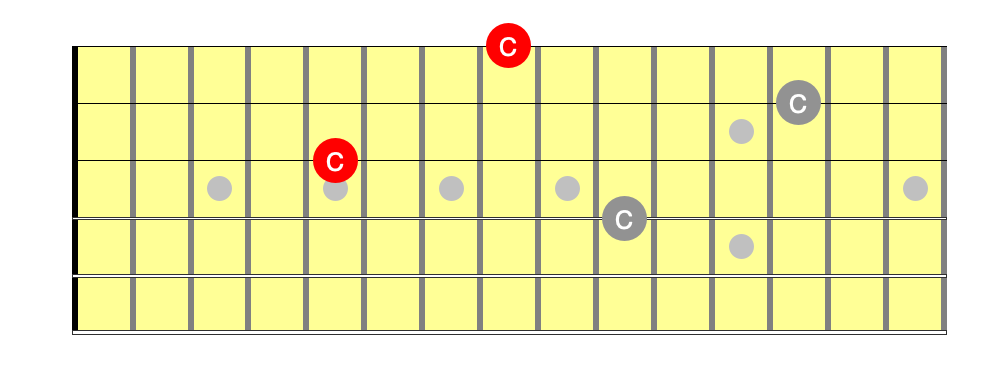
At first glance, this shape may look different than the previous one, but it’s important to realize that they are the same shape, even though there’s an additional fret between the notes.
Because of the tuning anomaly between the G and B strings (a M3 interval unlike the p4 between every other string pair) we have to move up an extra fret whenever a shape spans the G-B string gap. When navigating from the C at the 5th fret of the G string, we find the C on the 1st string up three frets, not two, on the 8th fret.
Same thing with the C at the 10th fret of the D string. The C on the B string is two strings, and three frets higher at fret 13 on the B string.
Two very important points about this first octave shape:
-
It works, of course, for any note, not just C. Look again at the diagram with all the natural notes: any given note exists two strings higher, and two or three frets higher depending on whether it crosses the G-B string boundary.
-
It also, of course, works in both directions. If you KNOW a note on a higher string, you can find the same note two strings and two or three frets lower.
In our case, the second point is useful to find notes on the 3rd string. We already KNOW the notes on the 1st (high E) string, so we can use these landmarks to navigate to notes on the G string pretty quickly: just move down three frets.
This first octave shape is particularly advantageous if you follow the recommended “one finger per fret” technique. If you put your pinky finger on any note on the high E string, you can find the same note on the G string under your first finger (or vice versa).
If you place your first finger on any note on the fifth or sixth strings, the same note can be found under your third finger two frets higher (or vice versa).
Exercise 14: Octave shapes for notes on D and G strings
Using the notes you already KNOW on string 6, go through the mostly-fourths sequence and use octave shape 1 to find all the natural notes on the D string. Repeat using natural note triads (thirds).
Using the notes you already KNOW on string 1, go through the cycle of fourths and use octave shape 1a to find all the natural notes on the G string. Repeat using natural note triads (thirds).
Octave shape 2
The next octave shape skips two strings, not just one:
Starting from the C at fret 8 on the low E string, we can find another C going up three strings and down three frets. Again, this works in both directions. If you’re on (or KNOW) a note on the G string, you can find the same note on the low E string by moving up three frets.
The “2a” shapes are shown in grey this time. Because we are skipping two strings in this shape, there are two “2a” shapes and only one “2” shape.
Again, whenever you cross the boundary between the 2nd and 3rd strings, you need to adjust by one fret. If you’re going up the strings (toward the thinner strings) you raise the higher note. So moving from the C at the 3rd fret of the A string, you only go down two frets and find the C on the 1st fret of the B string.
Going the other way from the C on the 8th fret of the high E, you find C on the D string at the 10th fret (going up two frets).
Most of the time when playing live, your natural inclination is to move your hand up the neck to play higher and down the neck to play lower. It’s thus more common to use octave shapes 1 most of the time. When you “run out of neck,” though, it can be useful to continue ascending or descending by skipping another string. (As we’ll later, octave shape 2 is particularly useful for studying triads.)
Exercise 15: Octave shape 2
Pick a random note and find it on the high E string. Then use octave shape 3 to find the same note one octave lower on the D string.
Find the same note on the low E string, and use octave shape 3a to find it an octave higher on the G string.
Repeat with other random notes, or use a sequence like the cycle of fourths or the natural note triads (cycle of thirds).
Other “octave” shapes
There are two more shapes worth knowing, but one is trivial, and the other is a little too far apart to be terribly useful for anything other than tuning up by ear.
The trivial “octave” shape is between the 1st and 6th strings (skipping 4 intervening strings). Obviously, since both strings are tuned to the same pitch, the note produced at any given fret on one string is found at the same fret on the other.
Note, however, that the note on the high E string is actually two octaves higher than one on the sixth string. (The note one octave between them can be found with the octave 1 shape or octave 2 shape from either string.)
The other “octave” shape is really a unison shape between two adjacent strings.
Here’s the C notes everywhere on the fretboard again.
You can see that C on the next higher string is always five frets lower (except, of course, between the G and B strings where it’s four frets lower).
That’s far enough away that it can be hard to visualize. The easiest way to use this one is to play the lower note with your pinky. Your first finger will naturally hover three frets lower. Simply move it down another whole step (two frets) and play the note on the next lower string. It’s exactly the same note in the same octave.
This last shape can be useful when you “run out of neck” on one of the middle strings. Just reposition your hand to an adjacent string and keep on rocking.
Finding all locations of a given notes
This next exercise is something you should practice regularly. It is an excellent drill for hammering home note locations.
Exercise 16: Connecting octave shapes to find a note everywhere on the fretboard
Play an open E on the 6th string. Use octave shape 1 to find and play the E one octave higher on the 4th string. Next use shape 1 again to find and play the E on the 2nd string. Refer to the first diagram on this page if you need to.
As always, be sure to say (or sing!) each note name out loud as you progress.
Next, use octave shape **2** to find and play the E on the 5th string (moving lower down the strings).
Now back to shape 1 to find the E's on strings 3 and 1. You should now be playing the note on the 12th fret of the high E string.
Whenever you end a sequence on one of the outside strings, use "octave" shape 3 to move to the other outside string. Play the E at fret 12 of the 6th string. The use shape 1 to find and play fret 14 on the D string.
Continue finding E's as high as you can reach comfortably on your guitar.
Now work through the mostly-fourths sequence of notes, always starting on the 6th string. Next up is finding all the A's (then DGCFB):
Find and play the A on the 6th string. Then continue moving up the neck using shape 1 and shape 2 as required. If you can't reach any higher, remember that you can always move a note 12 frets lower to the same note one octave lower (octave shape 0?). If for example, the A on fret 14 of the G string is as high as you can reach, play the A at fret 2 of the G string, then shape 1 to fret 5 of the 1st string (the last string you haven't played). Then "octave" shape 3 and you're back where you started.
Repeat with the triad note sequence (CEG, BDF, ACE, GBD, FAC, EGB, DFA)
Whether you realize it or not, you’ve now mapped out every natural note on the fretboard!
You should now be well on your way to KNOWING every note on three strings, and you’ve now got two “tools” to navigate using direct reckoning to the rest: diatonic intervals from other notes on the same string, and octave shapes from a different string.
Just one more lesson in this series: whole fretboard memorization drills.