This is the sixth and final lesson on learning the notes of the fretboard::
- Just 12 notes. (Background material)
- Open and E strings
- Practicing with actual songs
- Fret 5 and String 5
- Octave Shapes
- Whole Fretboard (this page)
This diagram of all the natural notes should look considerably less intimidating now:
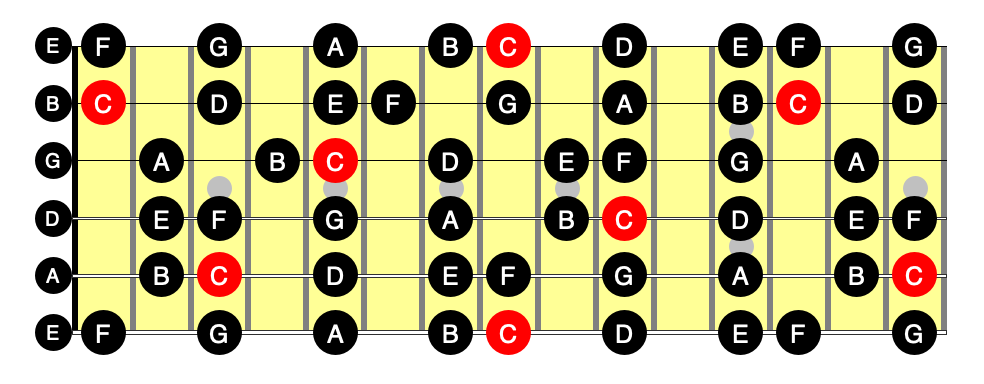
We’ve already drilled extensively on the outside E strings and the A strings, but we still need to learn the remaining notes on the D, G, and B strings.
Following our philosophy of always doing the hardest thing first, let’s first focus on the B string. We can get to the D and G strings using octave shapes from the outside strings, but it would take two steps to get to notes on the B string with octave shapes. The D and G strings can be reached with octave shapes from above or below in one step, but the B string requires two, so let’s tackle it directly.
Exactly as we did with string 5, we first perform a set of focused exercises just on just the 2nd string:
Exercise 17: B string focused drills
Start with the notes that are only one degree away from notes we already KNOW. Since we already know B and E, those notes are C, D, F and A.
Practice finding these notes in order: C, then D, then F, then A. C is on the first fret, just one higher than the open B you alreadky KNOW. D is a whole step below the E on the fifth fret, etc. Repeat slowly until you're confident you know them in order: C D F A, C D F A, etc.
Now go backward, AFDC.
We should now be pretty close to KNOWING six of the seven notes on this string. All that is missing is G.
Again, G is one of the "hard" notes that needs two step navigation to find, so dive in and try to learn that G even better than every other note on the string.
Play the G after you find it. See where it sits. Visualize the note name "G" hovering over the fretboard at that location, and, as always, say the note name as you play it. Spend extra effort on this note until you know it in your sleep.
Next we work through our familiar drills:
Work through the mostly-fourths sequence. Find, play, and say each note in as many places as you can reach on string 2.
-
Work through the notes in all the natural note triads, finding each note in as many locations on string 2 as you can.
You should now be pretty comfortable finding any notes on the outermost string pairs as well as the open notes and notes at the fifth and twelfth frets. In theory, you should KNOW all of these notes:
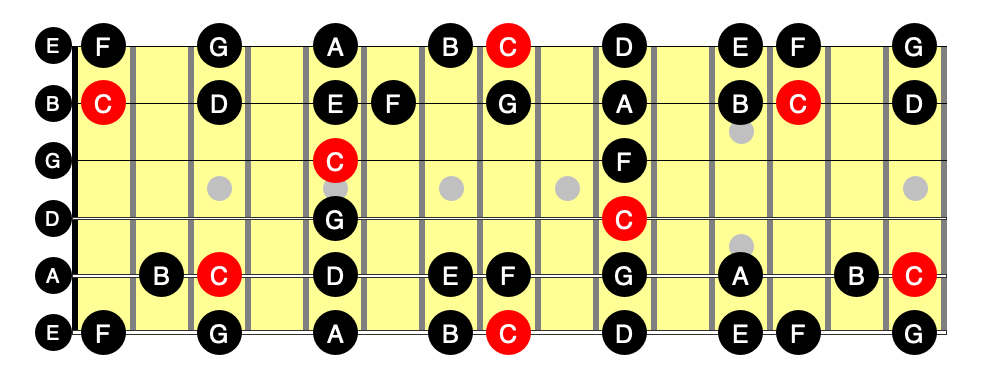
If you’re like most people, though, even with all the drilling we’ve done so far, it still takes a bit of effort to find all of the notes in the diagram above. One way to make this easier is to first focus on just a few “landmarks” (pilotage) on each string.
We’ve not yet spent any focused time on the innermost strings, the D and G strings, but we already know a couple notes on them (open strings and fifth fret). Let’s add just one more landmark to each of those strings.
Unlike the B string, all of the notes on the D and G strings can be reached in one step with octave shapes (that’s why we focused on the B string first). Try to figure out which note on the D and G strings is more than one scale degree away from the three locations we already know (open string, 5th fret, 12th fret). We want to turn those into landmarks as quickly as possible, before the last few remaining notes. (If you haven’t figured it out already, those notes are B on the D string, and E on the G string.)
Remember, we have two ways to navigate from landmarks to other notes: moving up or down a few frets along the same string from notes we already KNOW, and using octave shapes from different strings. It’s incredibly helpful to have at least three KNOWN notes fairly spread out on each string as quickly as possible. They make it easy to find the intervening notes without resorting to octave shapes.
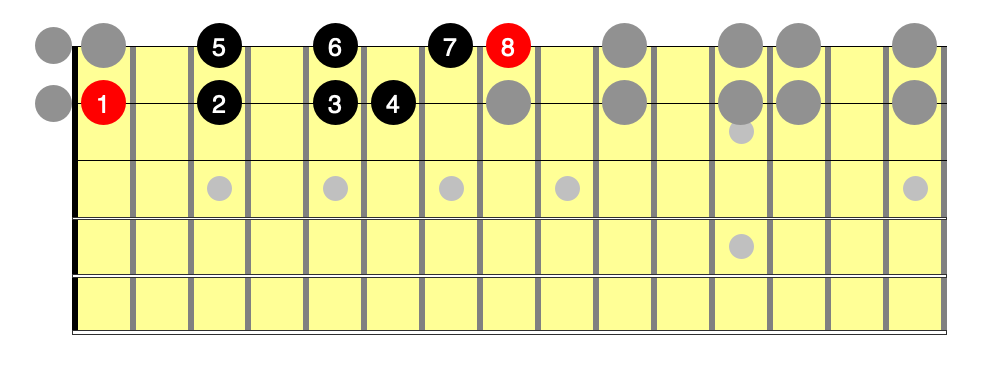
Here’s a diagram of what I consider the most critical “landmark” notes: open string, fifth fret, 12th fret, and “two-step” notes. If you really and truly KNOW these eighteen notes (three per string) you will never be more than one scale step away from finding any note on any string:
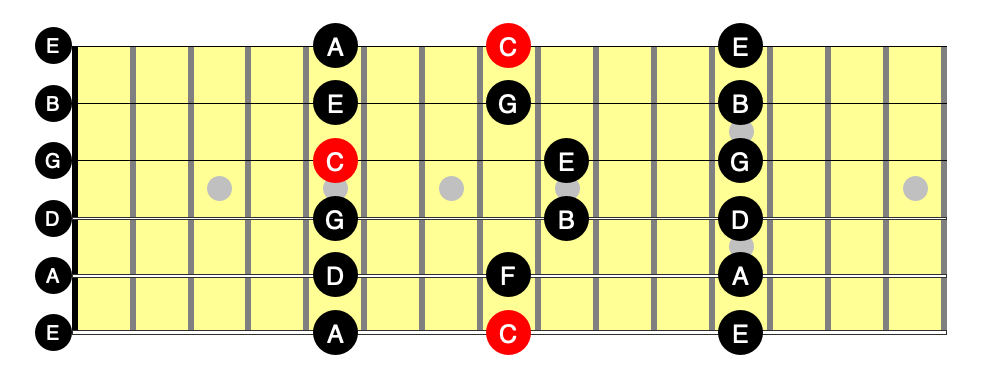
These are by far the most critical landmarks. Spend a lot of time with the next drill. Repeat the drill for several days (or weeks) until its automatic. Really hammer these notes home.
The sooner you really and truly KNOW these eighteen notes (the sooner you can pilot to these landmarks effortlessly) the sooner you’ll be able to find any note on the fretboard. Navigating via dead reckoning in just one scale step up or down from a known landmark can be pretty quick and easy. If you KNOW these landmark notes, that’s the hardest you’ll ever have to work to find a note.
Exercise 18: Landmark note drills
Use a metronome for both of these drills. Set it to a low tempo, say 60 BPM and play each note for four beats (whole notes). When four beats becomes easy, start changing notes every two beats. When you can successfully play and name every landmark note on every beat, you can be confident you have it down.
Drill #1: Across the strings
<li>
  Work your way across the open strings, low to high, naming them as you go: E A D G B E.
</li>

<li>Next, work down the notes on the fifth fret: A E C G D A.</li>

<li>Now up across the "two-step" notes: C F B E G C. Name them as you play them, of course.</li>

<li>Next, work down the notes at the 12th fret: E B G D A E.</li>

<li>Finally, reverse the direction and play back down the strings: up the 12th fret, down the two-step notes, up the 5th fret, and down the open strings.</li>
Drill #2: Along the strings
<li>Play and name the landmark notes on each string, working low string and low note to high: EACE ADFA DGBD GCEG BEGB EACE.</li>

<li>Now reverse direction: high note to low note, high string to low. ECAE BGEB GECG DBGD AFDA ECAE.</li>

<li>Finally, test yourself by randomly playing any of these notes and verifying you can name it instantly and effortlessly.</li>
We can now find any note by pilotage (just going to a landmark directly) or, worst case, moving up or down one or two frets from another note we already KNOW. Octave shapes provide another tool to verify or assist.
One more thing that can help, is to think of the semitone separated notes (B/C, and E/F) as almost one location. If you’re playing a B, it takes almost zero mental effort to find the C (and vice versa). Same for E and F.
I recommend you continue to focus on the landmark notes above, but look at how much more of the fretboard we cover just by adding these adjacent notes:
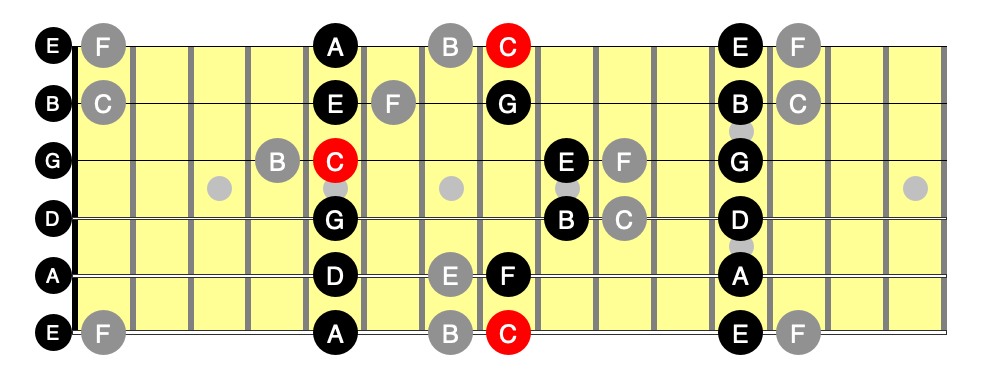
You get all the notes in grey almost for free!
Whole fretboard drills
Be sure you truly KNOW all the landmark notes above before attempting any of the following drills, but the remainder of this page contains a number of exercises you should add to your daily practice schedule. You never completely get off of the treadmill, but you should definitely plan to be repeating these exercises for several months at least.
You can quit practicing these exercises when you “KNOW the fretboard” as well and completely as you know the colors and of flavors of various fruits, as well as you know your family’s faces, and as well as the denominations of the coins in your pocket.
Exercise 19: Mostly-fourths across the whole neck
By now you should know this drill well: First find the note B on each string, then the note E, and so on. Play each note in as many places on each string as you can reach.
Alternate ascending the strings (starting with the low E, then A, etc.) with descending (starting on the high E string).
While we are mostly interested in KNOWING the natural notes, it's an excellent idea to practice the entire twelve note circle of fourths as well as the "mostly fourths" sequence of natural notes. That is, instead of looping back to B after finding all the F's, start finding all the B♭ notes. The full circle of fourths sequence is: B E A D G C F B♭ E♭ A♭ D♭ G♭ (then repeat).
Exercise 20: Natural triads across the whole neck
This one should be familiar as well. This time the sequence of notes we'll look for is CEG, BDF, ACE, GBD, FAC, EGB, DFA (then repeat). First find all the C's, then all the E's, etc.
Again, practice going down the strings as well as up. Use the metronome!
For extra credit, try finding the notes on adjacent strings. For example, find C on the low E string, then E on the A string, then G on the D string. Play each group of three notes together as a chord. Then find BDF on the next set of three strings, etc.
We will study these root position triads in later lessons, but it's excellent mental exercise to figure out the shapes using note names. You'll be doing a lot of this kind of thing as you progress.
Exercise 21: One octave C Major scales: 2 adjacent strings
Since we've already learned all the natural note locations on each string, it's trivial to play the C Major scale along any given string: just play each natural note in order. You'll hear the major scale quality (do re mi fa so la ti do) most clearly if you start and end on the note C.
To ensure we start low on the neck, let's start the exercise on the B string. First play the C major scale (CDEFGABC) along the B string: 1st fret, 3rd fret, etc., until you reach the C at the 13th fret.
Now practice stopping on the B string at any note you like and finding the next note on the E string, then continuing. For example, If you play the first four notes (CDEF) on the B string, the scale you play will look like this:
First play two notes (C and D) on the B string, then the remainder on the E string. Then three notes, then four, etc. Notice the pattern that emerges when you reach up a whole step or a half step onto the next string.
Use whatever fingering feels comfortable. This is not a technique exercise.
Now repeat the exercise on every other string pair (not necessarily in order). The goal is to learn the notes, of course, but knowing these patterns/shapes for playing the major scale will also prove helpful later.
Exercise 22: C Major scales: 3+ adjacent strings
This is just a riff on exercise 20. Instead of just shifting between strings once, we are going to play the Major scale over three or more strings (you can continue for more than one octave).
Practice finding, say, the note F on any given string, playing one or two more notes (say G and A) on that string, then shifting to the next string for a few more notes (say B, C, D), then shift to the next string, etc.
Because we are playing consecutive notes in exercises 20 and 21, we are never moving more than one or two semitones from a previous note. Unfortunately, this makes it easy to start thinking in terms of shapes. Try to force yourself to think and see the notes, though.
As always, test yourself with a metronome. You can, of course, descend through the scale as well as ascend.
Congratulations! If you’ve made it this far and through all of these drills, you can be confident that you’ve truly learned the fretboard.