This is part 2 of a multipart series on triads:
- Triad introduction and triads on G/B/E
- Major triads on other strings using octave drops (this page)
- Harmonizing scales with triads
Triads exist on more than just the top three strings, of course. The shapes change slightly on each different set of three strings because of how the guitar is tuned.
An excellent way to learn these additional shapes is using what Josh at Fretboard Anatomy calls “Octave Drop Chord Building.” Basically, we use familiar octave shapes to drop the highest pitched note in a triad shape we already know one octave (and three strings) lower.
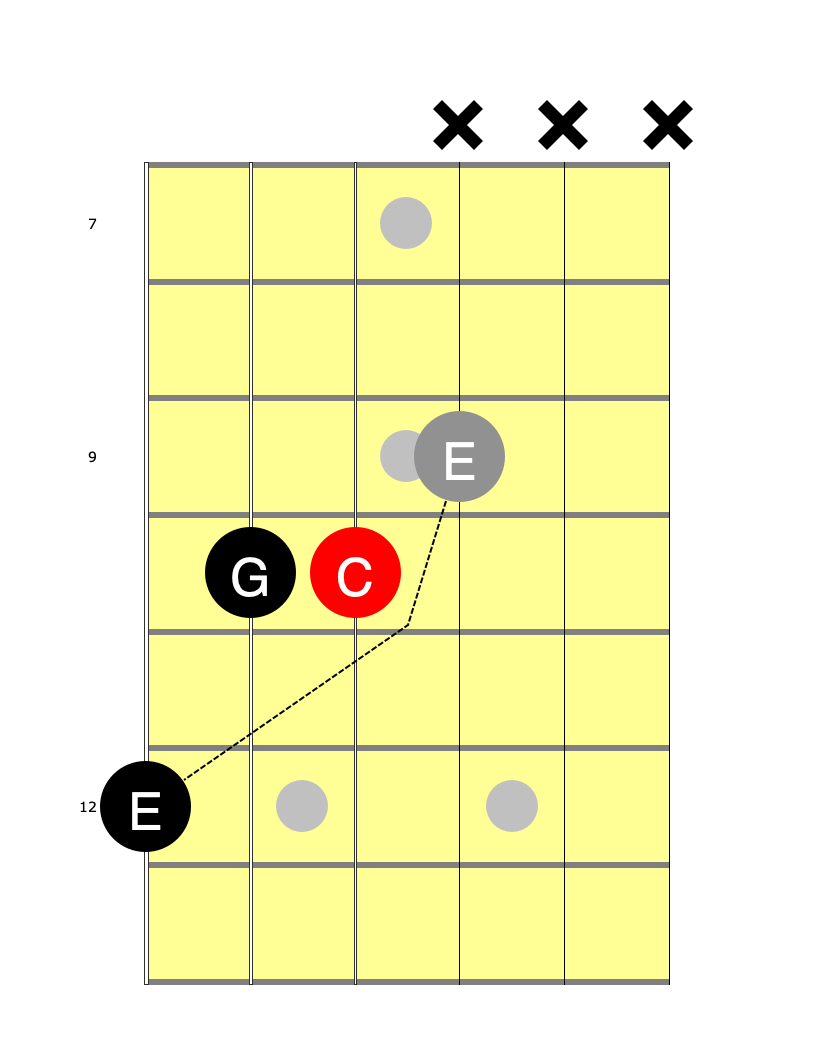
Starting with the root inversion C Major triad we already know:

We drop the G on the highest string one octave and play it on the D string like this:
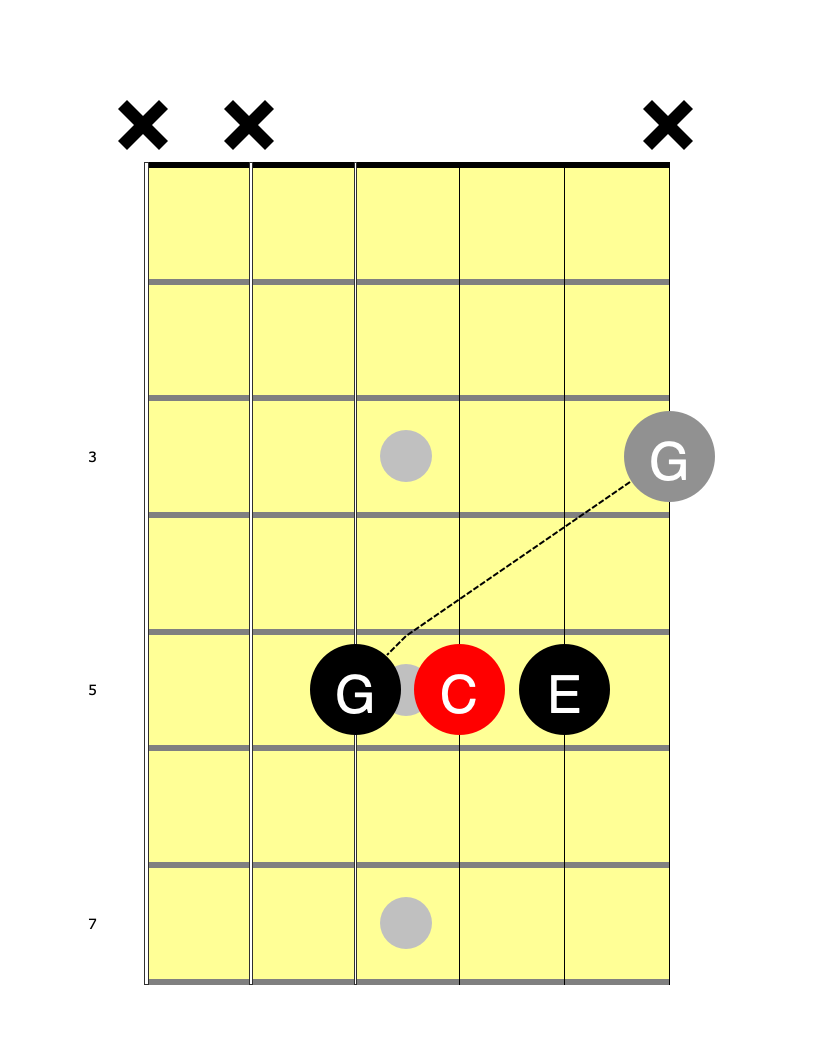
Since the fifth is now in the base, this is a 2nd inversion. You may recognize the shape from an open A chord (with that shape three frets lower down the neck).
We use the same process to move to the A, D, and G strings:

Then we find the root inversion in the same way on the low-E, A, and D strings:
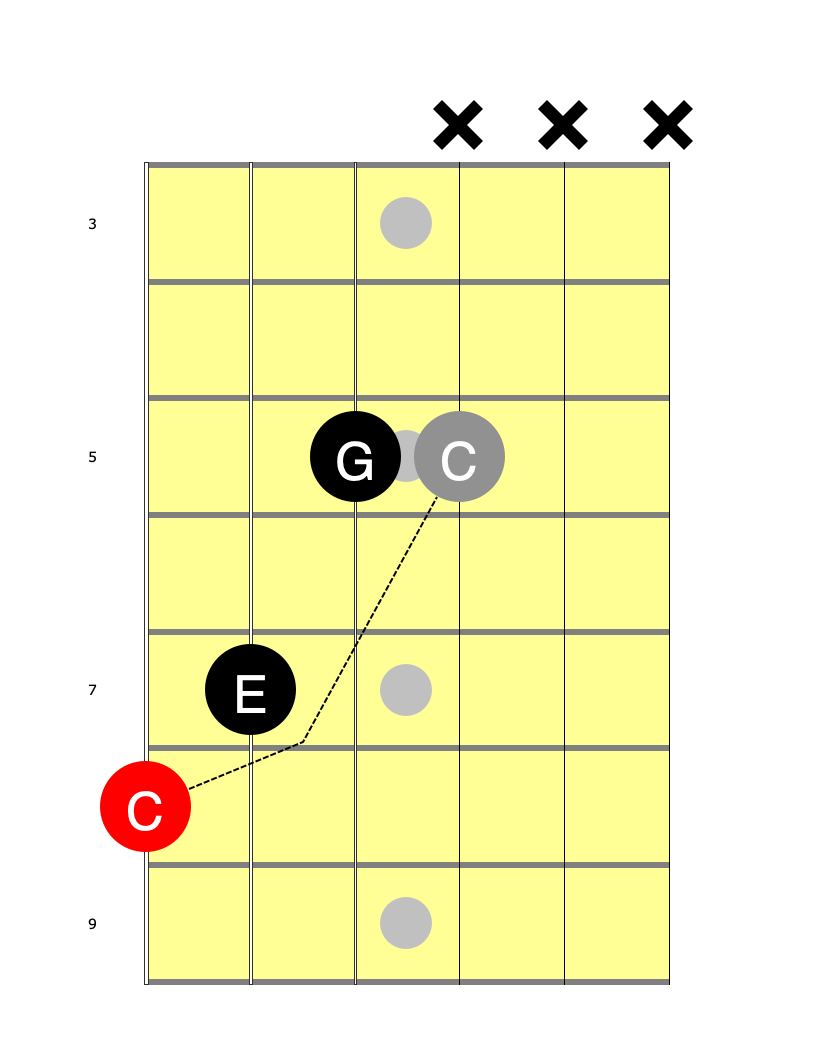
Note that we have a root inversion on both the lowest set of three strings and the highest set of three strings.
Exercise 5: Octave drop shapes 1, descending
Work through the circle of fourths, finding all major chords on all sets of three adjacent strings.
Start with B Major in root position on the the G/B/E strings. Then drop an octave onto D/G/B, then A/D/G, then E/A/D.
Next proceed through E Major, A Major, D Major, ..., all the way through G♭ Major.
Play each triad as a chord (all voices sounding simultaneously) and as an arpeggio (one note sounded after another, lowest pitch to highest).
Next, repeat the exercise, but this time start from the lowest course of three strings to the highest. Root position triad on E/A/D, then 1st inversion on A/D/G, then 2nd inversion on D/G/B, and finally, root inversion on G/B/E.
We can (and will!) use the exact same “octave drop” technique for every triad type (major, minor, diminished, or augmented) and any inversion. Indeed, you can use this with any chord, melody, or scale fragment! Before we explore the other triad types, however, let’s complete the octave drop technique with the remaining two inversions of a major triad.
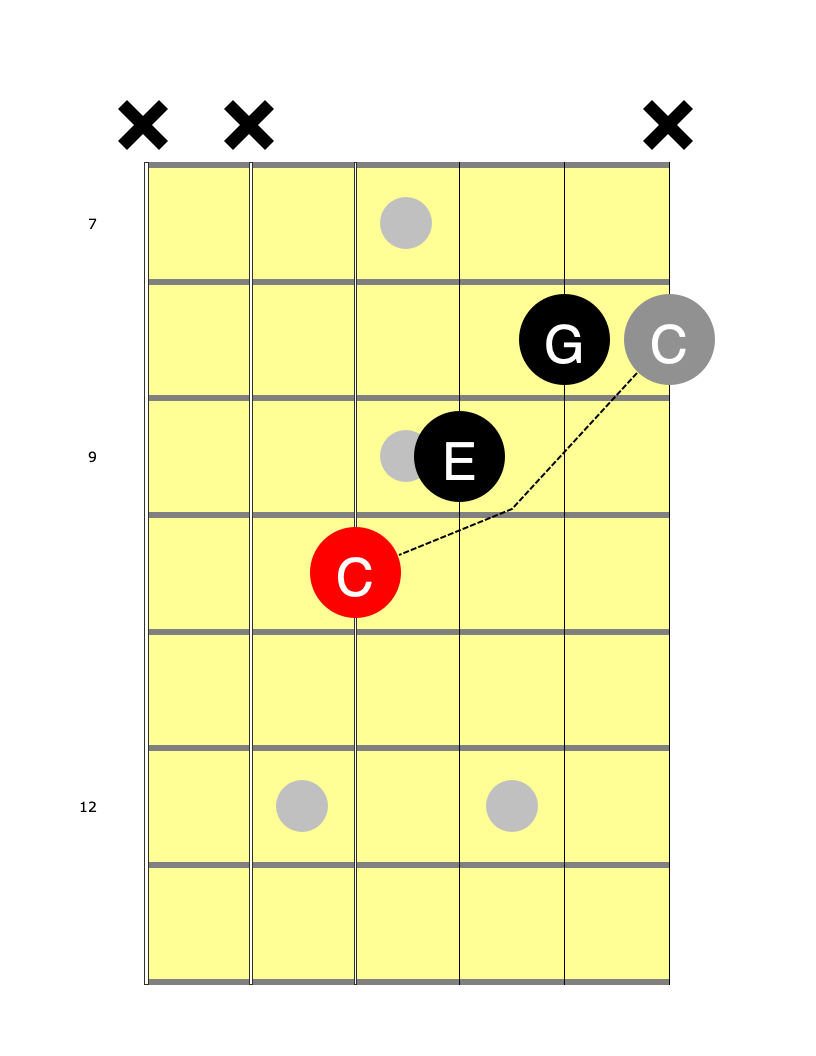
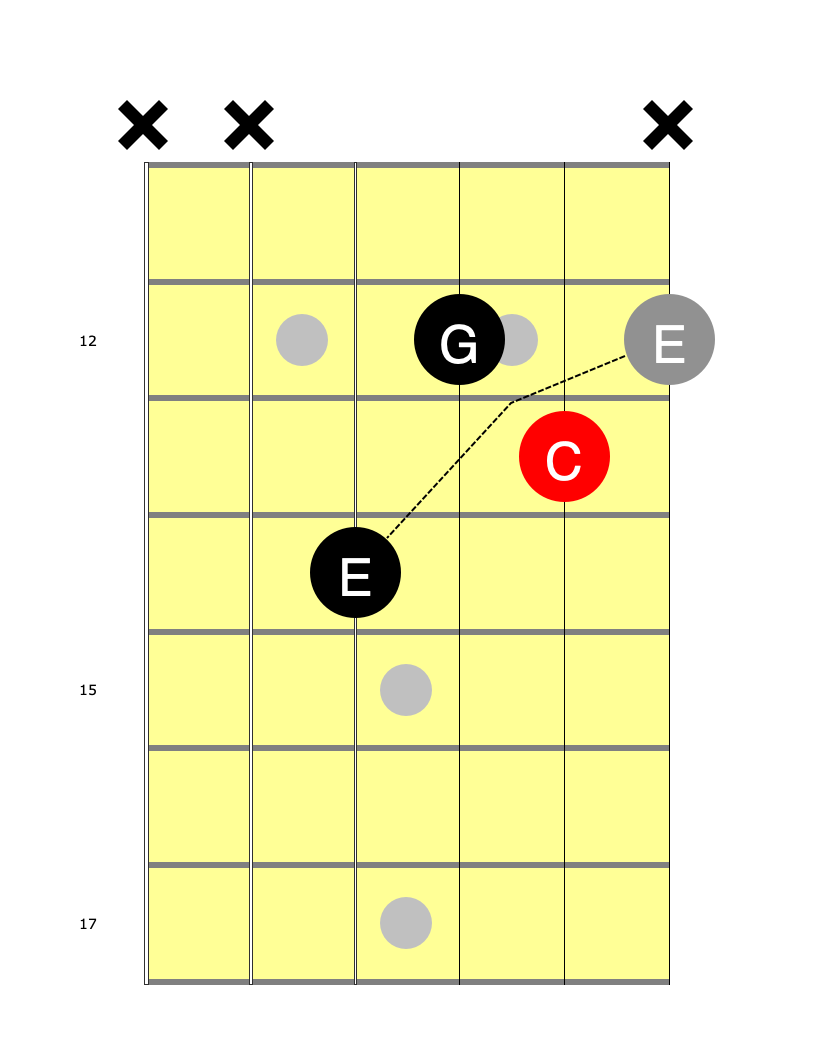
The root position dropped all the way down to the note C at the 8th fret of the low E string. The 1st inversion of C Major on the top strings is also at the 8th fret. So move the C over onto the same fret of the high E and start dropping the 1st inversion shape down the strings:
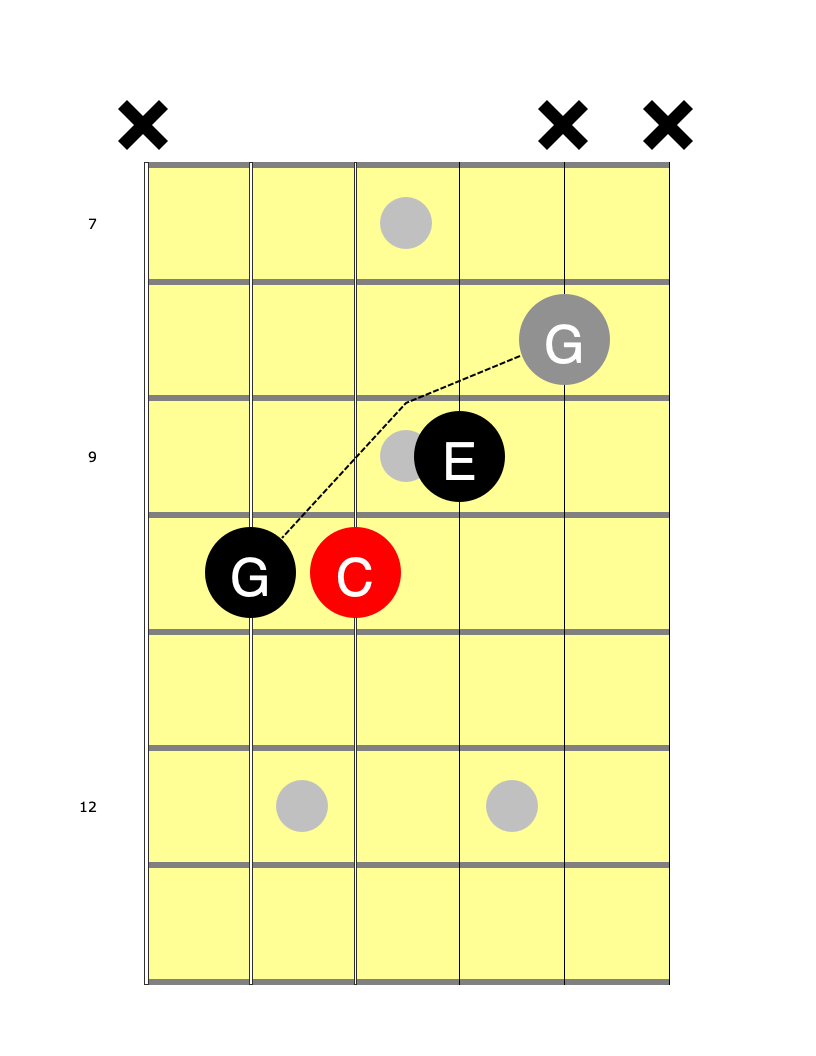
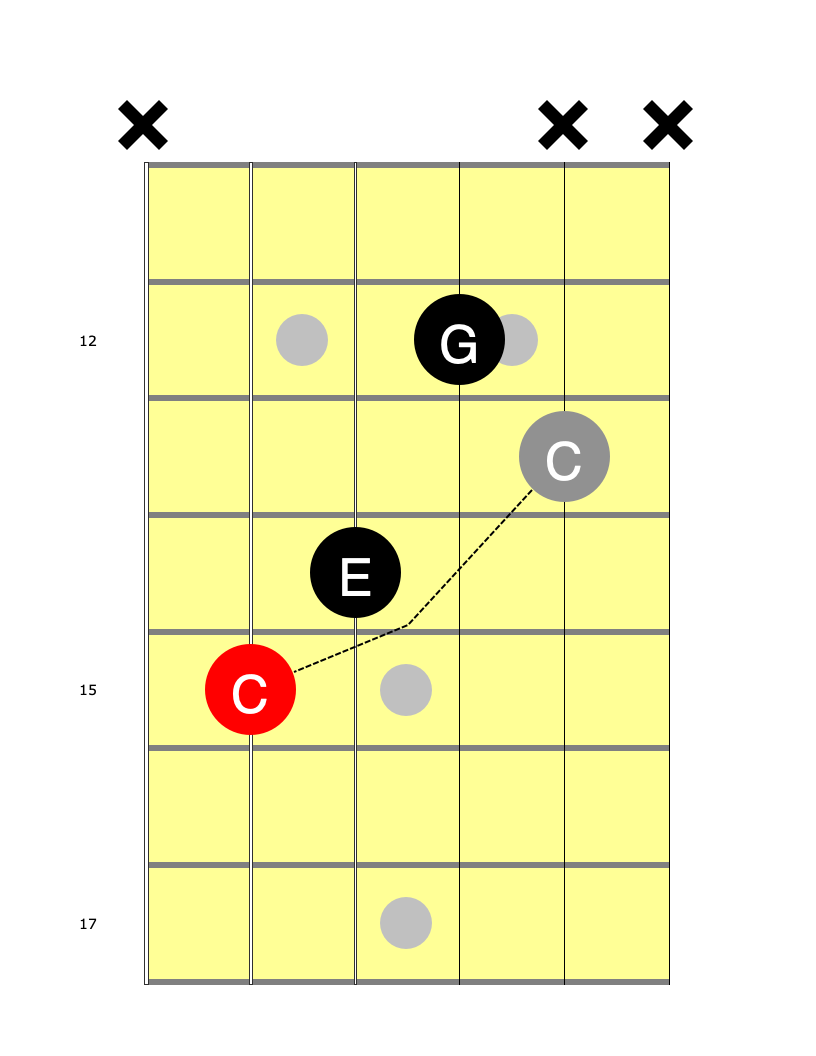
Now that we’ve “run out of strings” by dropping the 1st inversion, let’s continue with the last inversion of C major. First, move the E we dropped to the 6th string over to the same fret on the high E string, and then start dropping the 2nd inversion shape:
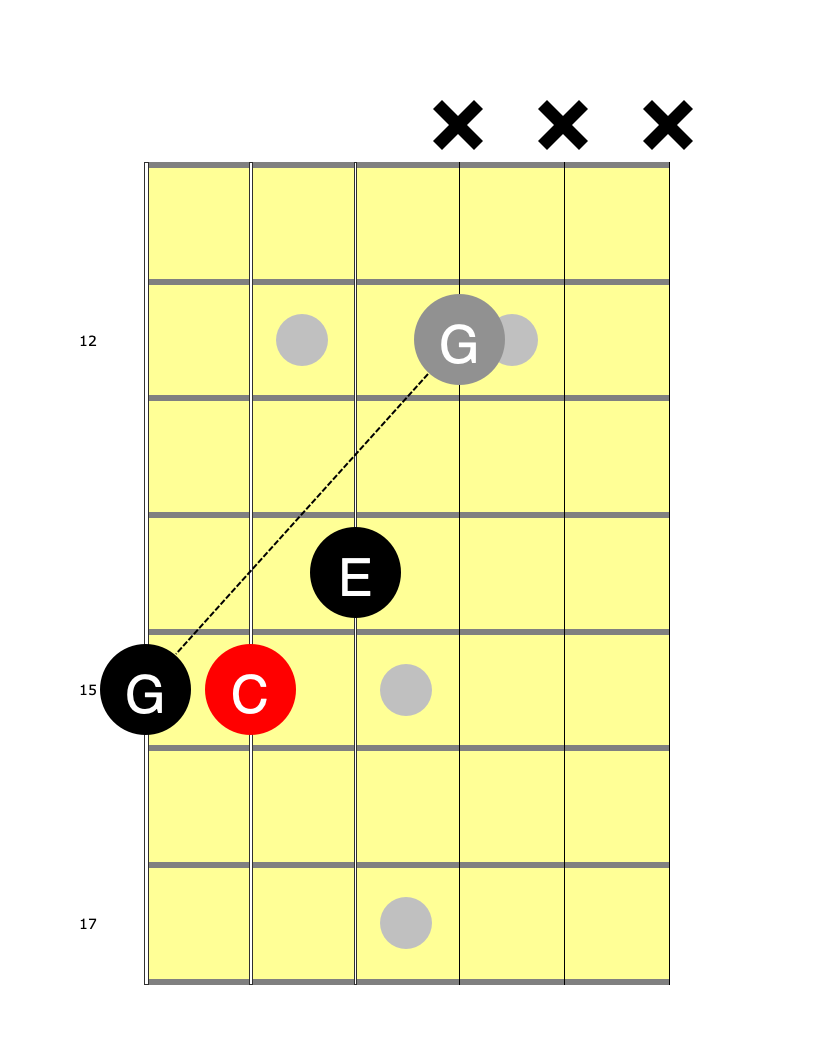
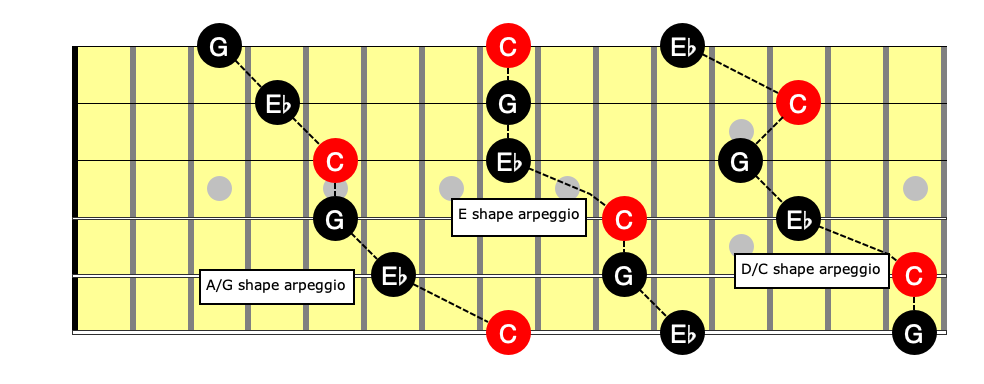
By dropping each triad inversion in this way, we’ve re-created the following C Major arpeggio shapes:

Notice how the last note on the low E string of one shape moves to the first note on the high E string of the next shape. The three shapes interconnect indefinitely this way.
I’ve labeled these shapes the “A/G arpeggio,” the “E arpeggio,” and the “D/C arpeggio” because of similarity to familiar open chord shapes. Despite the shape names, however, please understand that all three shapes are arpeggios for the C Major chord.
The top four strings of the A/G shape, for example, are the same shape as an A Major chord in open position. Similarly, the bottom four strings look like the shape of an open position G chord.
The E shape has the top five strings shaped like an open E (or an F chord at the first fret).
Lastly, the D/C arpeggio uses the open D shape on the top 3 strings, and the C shape on the top 5.
The shape names are just a trick that I and others find helpful for remembering them. Eventually, we will explore the CAGED system for navigating the fretboard, but CAGED is a whole separate discussion we will save for another lesson.
The way my mind works, though, is to see that clump of three notes at fret 5 in that last diagram as “the A shape” that the rest of the notes in the arpeggio hang off of. If I position that three-note shape at the fifth fret I can play a C major arpeggio. At the 10th fret, it’s an F major arpeggio, and so on.
Similarly, I “see” an E-shaped, three-note cluster at the 9th and 10th frets of the middle arpeggio (the notes G, C, and E starting on the 5th string in the diagram above). You are probably familiar with the E shaped barre chord with the root on the 6th string. In this case, the C on the lowest string isn’t part of the middle drop-octave arpeggio shape, but it is part of the barre chord, and we’ll soon get to other arpeggio shapes that include it.
For now, use the following exercise to become intimately familiar with these three major arpeggio shapes and how they interconnect.
Exercise 6: major arpeggio shapes
We are going to work through the cycle of fourths again, but this time instead of starting with B major (which can't be played in open position) let's start with C.
Hopefully, the open position C Major chord is extremely familiar to you. As we discussed, this is part of the "D/C Arpeggio" shape above. So instead of playing that arpeggio beginning at the 12th fret, we'll start with open high E.
Play the open E, then the C on the B string, then the open G string, and so on, working through the D/C arpeggio shape until you end up at the G on the low E string.
Next, move the G over to the same fret on the high E string, and continue with the next arpeggio shape (the A/G arpeggio shape).
Then continue with the E arpeggio shape by moving the lowest note up to the high E string again.
Continue in this fashion playing the notes in C major as high up the neck as you can reach comfortably.
When you run out of neck, move onto the next chord in the circle of fourths. Find the lowest major triad shape on the G/B/E strings. In this case, we're looking for F Major (the notes F, A, and C) so the "E shape" arpeggio (and regular old F barre chord) is where you start. Play the F on the high E string and continue threading the arpeggio shapes together as high up the neck as you can comfortably reach.
After F comes B♭ (or just B if you want to use the "mostly fourths" sequence and ignore sharps and flats for a while). Either way, you'll start with the "A/G" shape arpeggio and the root position triad on the top three strings this time.
Continue this way until you've worked through the complete cycle. Always start with the lowest triad you can find on the top three strings for each new chord (as we practiced in exercise 1).
The process is exactly the same for minor, diminished, and augmented arpeggios.
Here are the minor arpeggio shapes:
Exercise 7: minor arpeggio shapes
Repeat exercise five, but this time using minor arpeggio shapes. Once you get the hang of it, and see how the shapes connect, start using a metronome. Whole notes, then half notes, and finally quarter notes.
As stated previously, major and minor triads are by far the most commonly played. Many players go their entire lives without playing diminished or augmented triads (at least not knowingly: diminished and augmented triads show up inside of extended and altered chords with four or more notes).
Here are a few more exercises to help you get the major and minor shapes under your fingers.
It isn’t necessary to complete all of these before moving on, but be sure you are at least reasonably familiar with the major and minor triad shapes before continuing to the next lesson about harmonized scales
Come back to these exercises often until you can complete all of them to a metronome. You don’t need to work through them in order. It’s okay to pick and choose the ones that interest you most, or where you think you need the most work. Be sure to work through all of them eventually, however.
Exercise 8: E/A/D major triads along the strings
Using the full or partial cycle of fourths, play each major triad inversion on the low E/A/D strings. Start with the inversion as low on the neck as possible.
Play B Major 2nd inversion (with the root on the A string) for example. Then play the root inversion with the B on the E string. Then the 1st inversion at the 11th fret. Continue up the neck as far as you can reach comfortably.
Repeat for E, then A, then D, etc. until you've worked through the full cycle of fourths.
Have I mentioned that it's important to know the cycle backwards as well as forwards? Backward (F C G D A E B G♭ D♭ A♭ E♭ B♭) it becomes the cycle of fifths because the inverse of a fourth is a fifth. Practice working through the cycle of fifths at least as often as you work through the cycle of fourths.
Exercise 9: E/A/D minor triads along the strings
Using the full or partial cycle of fourths/fifths, play each minor triad inversion on the low E/A/D strings. Start with the inversion as low on the neck as possible.
Play B minor 2nd inversion (with the root on the A string) for example. Then play the root inversion with the B on the E string. Then the 1st inversion at the 10th fret. Continue up the neck as far as you can reach comfortably.
Repeat for E, then A, then D, etc. until you've worked through the full cycle of fourths (or backwards through the cycle of fifths).
Exercise 10: (Advanced) E/A/D major triads in position
Choose a position on the fretboard, say frets 1-5. Using the full or partial cycle of fourths/fifths, try to play each major triad in position, choosing inversions that require you to move your hand as little as possible.
For example, play B Major 2nd inversion (with the root on the A string). Then play the E Major 1st inversion with the root on the D string (shifting your hand up one fret). Then A root inversion. Then D 2nd inversion, shifting your hand back down a fret and using the open strings.
Continue in this fashion through the entire cycle (or at least the natural notes). Then pick a new position on the neck and repeat the process.
Exercise 11: (Advanced) E/A/D minor triads in position
Choose a position on the fretboard, say frets 1-5. Using the full or partial cycle of fourths/fifths, try to play each minor triad in position, choosing inversions that require you to move your hand as little as possible.
For example, play B Major 2nd inversion (with the root on the A string). Then play the E Major 1st inversion with the root on the D string (shifting your hand up one fret). Then A root inversion. Then D 2nd inversion, shifting your hand back down a fret and using the open strings.
Continue in this fashion through the entire cycle (or at least the natural notes). Then pick a new position on the neck and repeat the process.
Exercise 12: A/D/G major triads along the strings
Using the full or partial cycle of fourths, play each major triad inversion on the A/D/G strings. Start with the inversion as low on the neck as possible.
Play B Major 1st inversion (with the root on the G string) for example. Then play the 2nd inversion with the B on the D string. Then the root inversion at the 14th fret. Continue up the neck as far as you can reach comfortably.
Repeat for E, then A, then D, etc. until you've worked through the full cycle.
Exercise 13: A/D/G minor triads along the strings
Using the full or partial cycle of fourths/fifths, play each minor triad inversion on the A/D/G strings. Start with the inversion as low on the neck as possible.
Play B minor 1st inversion (with the root on the G string) for example. Then play the 2nd inversion with the B on the D string. Then the root inversion at the 14th fret. Continue up the neck as far as you can reach comfortably.
Repeat for E, then A, then D, etc. until you've worked through the full cycle of fourths (or backwards through the cycle of fifths).
Exercise 14: (Advanced) A/D/G major triads in position
Exercise 15: (Advanced) A/D/G minor triads in position
Exercise 16: D/G/B major triads along the strings
Exercise 17: D/G/B minor triads along the strings
Exercise 18: (Advanced) D/G/B major triads in position
Exercise 19: (Advanced) D/G/B minor triads in position
Exercise 20: G/B/E major triads along the strings
Exercise 21: G/B/E minor triads along the strings
Exercise 22: (Advanced) G/B/E major triads in position
Exercise 23: (Advanced) G/B/E minor triads in position
Next up: how to use triads to harmonize the major scale