This post discusses The Frying Pan, which I consider to be the ideal first scale shape for a beginner to study when learning how to solo.
[This is a continuation from my previous post about what’s wrong with the Am pentatonic “scale” that everyone usually learns first. Please read that if you haven’t already.]
A scale is nothing more than a collection of different notes, but because the same note can appear in many locations on the fretboard it’s handy to use shapes to organize and remember how to play the notes within a scale.
I can play just the single note E in thirteen distinct locations and five different octaves on my favorite guitar. It’s hard enough remembering the locations for even a single note, much less the five or more notes within a given scale. Memorizing and thinking about one shape at a time is about the only way to make it tractable.
But it’s important to realize that different fragments of a scale within different shapes do not evoke different feelings! A root note evokes pretty much the same color/taste/feeling no matter which register or octave its in. The same is true for the other notes in the scale.
The overall excitement and interest of your solos will vary as you ascend or descend into different octaves, but the function and feeling/taste of each note within each octave stays the same. Apples come in all different shapes, sizes, and flavors, but they all still taste like apples.
Every single note within a scale has a unique sound quality or character when played over an underlying chord, no matter which octave of the note you play. This quality changes over different chords, though. An A natural note played over an A or Am chord is obviously going to sound great. You can certainly tell when jumping between octaves of an A note over the chord, but they all have the same resonant quality and all of them will sound extremely … comfortable.
It might not be quite as obvious yet that an E natural sounds almost as resonant. A soloist’s E note over an A chord adds its own tiny bit of … salty-sweetness (it sounds slightly Celtic to my ears). Some notes within a scale are going to sound sweet, some salty, some flat-out sour over a given chord (to mix metaphors).
The only way to compose a great melody, whether it’s an on-the-fly solo or a well thought out song, is if you viscerally understand how these notes sound over different chords. There is far more to composing a great solo than that, but knowing in advance how a note will sound over a given chord is the absolute minimum requirement for composing melodies.
That’s why I think it’s a mistake to teach beginners multi-octave scale shapes like “box 1” of the Am pentatonic scale. If the same note exists in multiple locations, it’s simply too hard to know which note you’re playing at any given instant.
Far better, in my opinion, to start with single octave scale shapes. One of the best ones to start with, in my opinion, is what Andrew Wasson calls the frying pan shape (the shape looks a little like a frying pan turned on it’s side, with the handle pointing up the neck). Please do watch Andrew’s video, it’s well worth your time (it basically summarizes both of these posts into a seven minute video).
If each note only exists in one location, it’s a lot easier to know what you’re playing and start hearing how each note sounds.
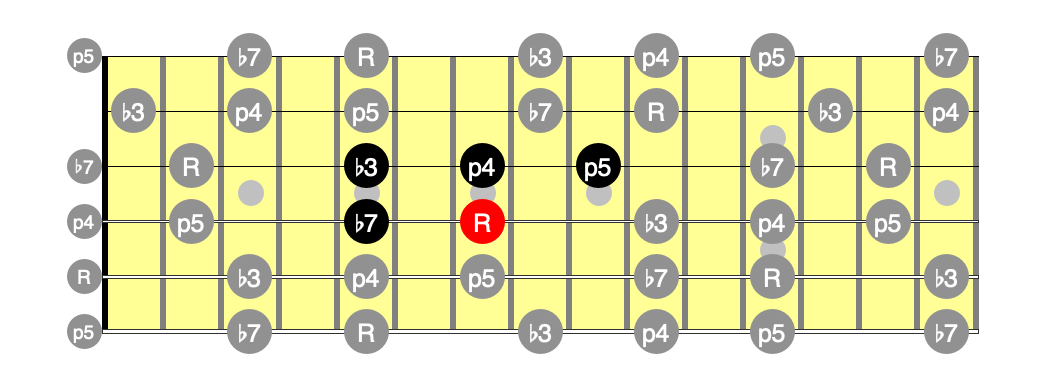
Here is the Am pentatonic scale in every location on the neck, with the “frying pan” shape highlighted in the middle.
There’s a great line in one of the comments to Andrew’s video:
If you can’t hear it in your head first, you don’t own it and probably shouldn’t be playing it.
[emphasis added]
The red note labeled “R” is the root, or the note “A”. Notice how the root note is at the “heel” of the frying pan shape. Remember this, it’ll come in handy as we move this shape around for other chords.
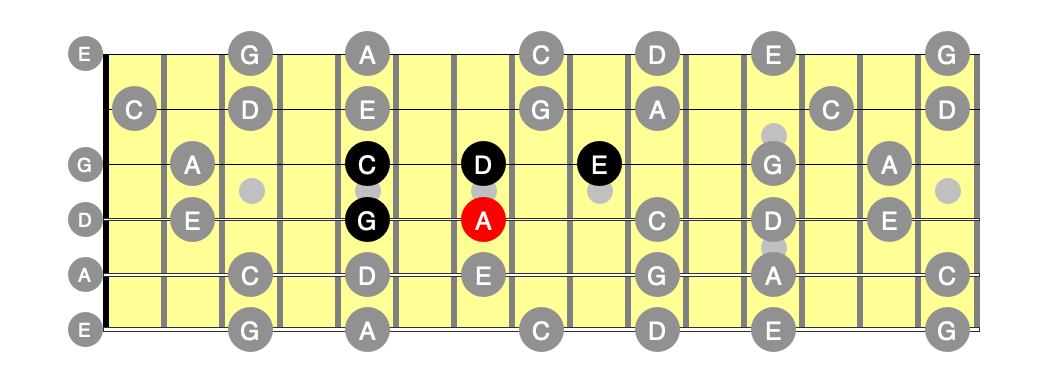
That diagram labels each note with its function relative to the A minor triad (chord). The function of a note changes every time the underlying chord changes, but every note also has a fixed name that never changes. Here’s the exact same diagram, but using note names rather than its function:
As I hope you can see, the note A is also known as the root of Am, C is the flat third, D the perfect fourth, E the perfect fifth, and G the flat seventh. But these are just names.
Music is made from sounds, not names, not shapes. Geez that sounds obvious, but people often lose sight (err, hearing) of this as they study the instrument.
The primary purpose of this post is to get you to start hearing the quality of each of these individual notes over different chords.
Try it!
First you need to find find suitable accompaniment.
It’s always best to start simple by continuously looping a single Am chord (ideally with interesting but consistent rhythms and inversions/arpeggiation — don’t worry if those words don’t mean anything to you yet).
The simplest (albeit potentially boring) thing is to just record yourself slowly playing an Am chord over and over on your phone or whatever (hopefully with a fairly consistent rhythm). Just a simple one-strum-per-beat recording is fine for this. If you know more than one shape for an Am, use all of them.
Better (if less likely) is to find a very good (and possibly somewhat slow) friend who’s willing to just play an Am over and over and over for hours while you experiment.
Best is an app like iReal Pro that lets you loop a single chord or progression of multiple chords as many times as you want (with any given tempo, multiple styles, and continually varied inversions/arpeggiation). If you’re interested in learning how to solo, that app is a godsend — the forums provide freely downloadable charts for thousands of songs. Nobody will mistake the sound for a real band, but a real band is unlikely to be willing to loop the same changes umpteen hundred times in a row or slow down the tempo to a snail’s crawl.
Also sometimes useful are free backing tracks on YouTube (just search for “backing track in Am,” for example) but beware that most of these contain chord progressions with multiple chords, and don’t always indicate what chord is playing at any given moment. It’s up to you to figure out which chords you’re soloing over.
Whatever you choose, start your accompaniment and slowly play each note in the shape. Really listen to how each note sounds, how it makes feels and tastes. Try to turn off your brain, just listen and feel (but make sure you only play those five notes for now). It’s important to do this with accompaniment: you’re training your ear more than your hands, and context is everything. An A (the root note) will sound quite different over other chords than an Am (it sounds terrible over some chords) but it will sound great over an Am (though eventually it will get pretty boring, too much of anything gets annoying).
Once you know what you are doing, you can literally force any note to sound good over any chord, but for now we are just trying to get our brains to associate the obvious sweet notes with that Am chord.
After going straight up and down the scale a few times, one note after the other, start mixing it up in random order (and later with the patterns I’ll describe below). Play around with different articulation, too: vibrato, bends, slides, hammer-ons, pull-offs, etc. Don’t forget your inner Neil Young: it’s okay to play the same note multiple times in a row. Seek out interesting rhythms.
After a while it should become obvious that the root note, A, always sounds “best”. In fact, you’ll want almost every little line or phrase of notes you create to “resolve” to an A (a fancy way of saying “end up on an A”). Each phrase that ends on an A will sound … complete, back home, content. This should happen naturally, without much thought. You should just find your fingers ending up on that root note. Tension and release is the essence of soloing: every note you play other than the root adds a bit of tension (some more than others), every time you come back home to the root you release that tension.
Try it: consciously play “lines” of notes that end up at the “heel” of the frying pan (the root note A).
This should be a pretty fun exercise by this point.
For me, it was the first time I felt like I was actually soloing. This is because I was playing with intent, actually targeting sounds I could hear in my head, before I played them. It’s incredibly satisfying when you finally break through from mindless noodling to actually creating lines and musical expressions or phrases.
At this point you’ll probably just be making a few random words or phrases, and not complete sentences or stories, because we’ve intentionally limited ourselves to just five specific notes. Still, it’s sobering just how many cool words and phrases you can create even with this severely limited palette. Pro’s can express an awful lot with even fewer notes for surprisingly long periods of time.
Eventually, you’ll probably find yourself repeating the same few patterns and lines, most likely using quick runs up and down the scale in order to get where you want to go.
One helpful trick to address this is to practice pre-defined patterns with each new scale or scale fragment (shape) you learn. These patterns will still sound somewhat mechanical, but practicing them regularly can help you break out of the habit of just linearly going up and down the scale, and pieces of these patterns should automatically find their way into your solos.
Scale Practice patterns
It’s probably better to practice these with a metronome rather than a backing track (less temptation to lose focus and start soloing!). These patterns are as much for your fingers as they are for your ears.
For reference, here’s the diagram again:
-
Play in sequences of three. Play three notes in a row, back up a note, then three in a row, and repeat until you reach the end of the scale. For this shape, play the notes G, then A, then C. Next back up a note and play A, C, D. Finally, back up again and play C, D, and E. Now reverse direction and play the sequence down the scale: E, D, C, then D, C, A, and finally C, A, G. Keep playing this pattern up and down for a while, gradually increasing the tempo on your metronome (try playing each three note group as a triplet). [Extra credit if you say the note names out loud as you work through the sequence — it helps your brain associate note names with fretboard locations.]
-
Play in sequences of four. This is basically the same idea: Play G, A, C, D, then A, C, D, E. Then reverse: E, D, C, A followed by D, C, A, G. Once we start looking at larger scale shapes (potentially in multiple octaves) even longer sequences will also be worth practicing.
-
Play in thirds. “In thirds” means we play every third note (every other note). Start with G, skip the second note A, and play the third note C. Now back up and play A followed by D, then C followed by E. Now reverse the sequence: E-C, D-A, C-G. Again, this gets more interesting when we start studying longer scale shapes (like the 12-note “box 1” shape) and can be extended to fourth, fifths, or even sixths or sevenths.
Get in the habit of practicing these sorts of patterns with every new scale shape (or even arpeggio) you study.
Wrap-up
Hopefully this shape and these exercises are starting to open your ears and get your creative juices flowing. Come back to this periodically. Sometimes it helps to simplify things down to their absolute essence.
The next post will cover extending this shape to more locations on the neck, but still over a single A minor chord. By now, though, you’ve probably realized you can use this shape to solo over any minor chord simply by shifting the shape up or down a few frets. Can’t find an Am backing track, but you’ve got a good one in Gm? Plop that “heel” of the frying pan on fret five instead of fret seven and everything you’ve been practicing still works.
Have fun!