Like most beginning guitarists, I dream of being able to effortlessly “trade licks” with other players, switching freely between rhythm and lead, and creating beautiful melodies on the fly.
Rhythm (accompaniment or “comping”) and melody (lead or soloing) are far more intertwined than you might think. Both require that you truly and thoroughly understand (i.e. KNOW) basic scales. I believe that both are utterly dependent on knowing, really KNOWING at least the minor pentatonic scale and a few chord/arpeggio shapes. You can go a very long way with just that one scale and a few chords.
I’m not there yet, but I believe the best soloists hear the note they want to play in their minds before they play it. They know how every note will sound over the current chord and play with intent. The only way to get there is to practice scales and arpeggios over and over and over again until they are completely automatic and your mind knows what sound is coming before your fingers play it.
The first and probably most important scale for most is the good ole pentatonic scale. It can sound pretty good over almost any blues, rock, or country progression. Just five notes, how hard can it be?
As always, there is a lot of complexity hiding below the surface of “just five notes”. To begin with, which five notes?
Most people start with the notes A, C, D, E, and G: the Am pentatonic scale. More specifically, they usually start with “position 1” (or box 1) of the scale starting on the 5th fret. It has several nice features:
-
It sits right in the middle of the neck, the “goldilocks zone” where frets are neither too far apart nor too close together to play comfortably.
-
It only comprises five natural notes (A, C, D, E, and G). If you’ve already learned the locations of all the natural notes on the neck, you don’t have to worry about any of those pesky sharps and flats that lie between notes you already know.
-
Even though it’s a minor scale (containing the scale degrees: root, ♭3, p4, p5, and ♭7) it can sound pretty nice and bluesy over even a major chord progression (especially a blues or dominant chord progression).
-
It shares exactly the same notes as the C Major pentatonic scale. It all depends on how you use it. If you end your licks on A and emphasize the notes A, C, and G it will sound “A minorish”. If you end your licks on C and emphasize the notes C, E, and B, it will sound “C Majorish”.
Learning the Am pentatonic scales
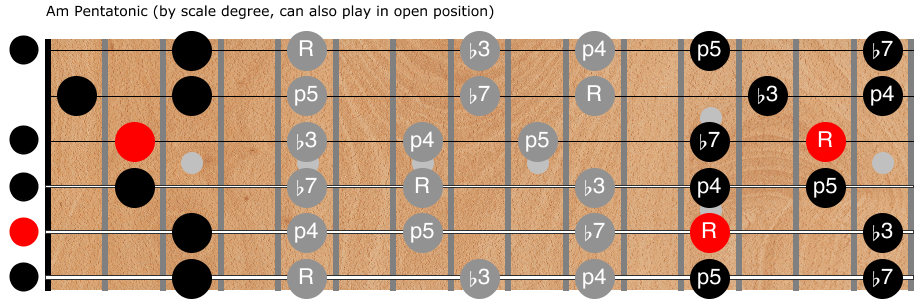
Most books and online lessons start by showing you just position one (a “shape”) in isolation. I find this misleading at best. It’s important to realize that the scale is just those five notes wherever they appear on the neck:
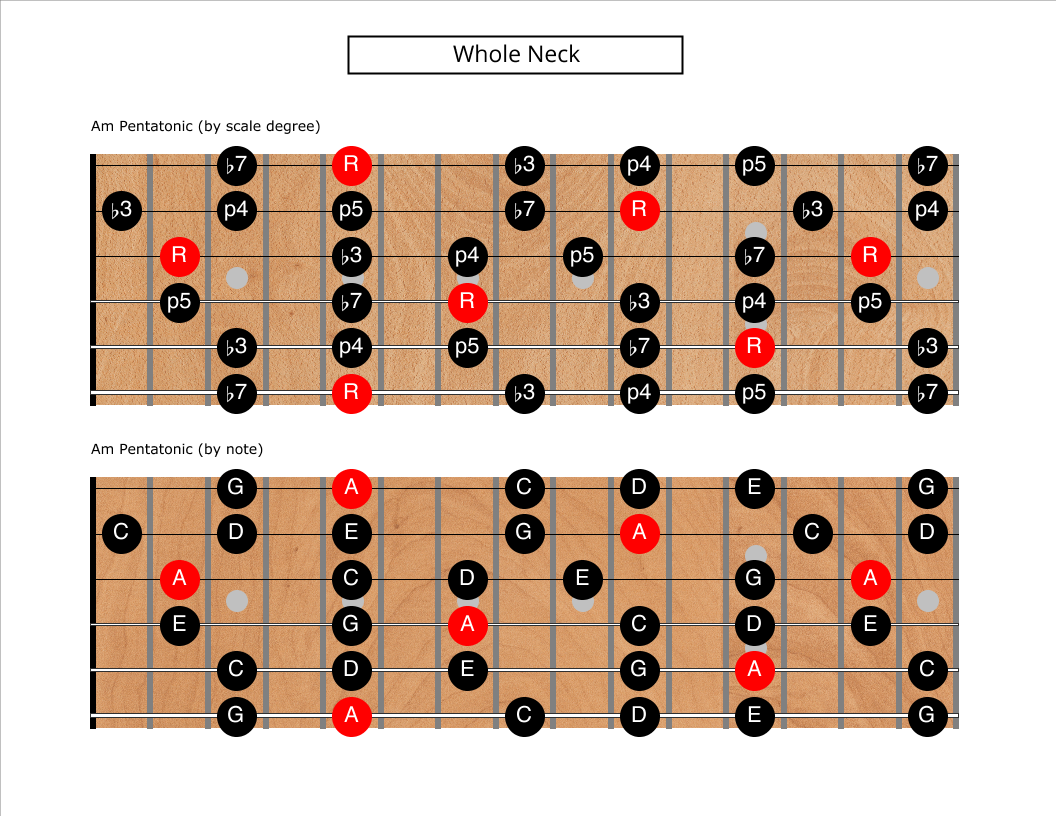
Until you can find and play all of the notes in that diagram (and only those notes!) you haven’t learned the scale.
This is admittedly a tall order, but like everything it can be broken into smaller pieces and learned one small step at a time. It’s incredibly important to learn how all these pieces interconnect, though, and that they are all just different ways of visualizing a sequence of the same five notes in different octaves.
Start with the “frying pan”
You may want to see my series of posts about the “frying pan” shape before learning the entire Am Pentatonic scale. It’s important to internalize the sound of each of the five notes before going further.
All of the exercises and techniques from that series is equally applicable to the five positions of the full scale everywhere on the neck.
Next learn position one
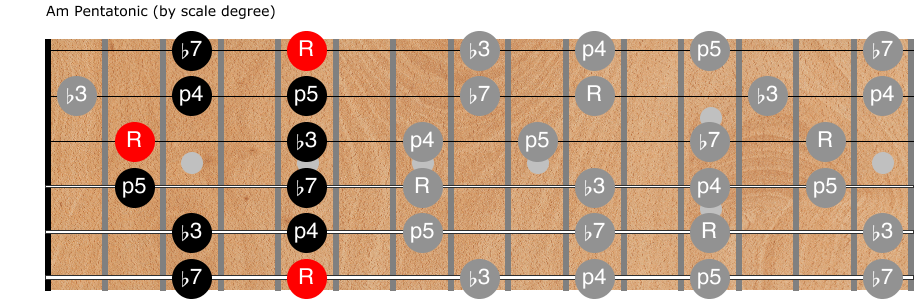
Here’s position one of the scale:
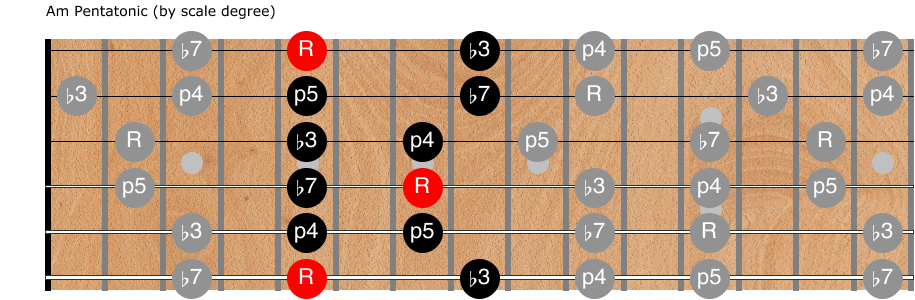
This position (or shape) contains two full octaves of the scale (plus two more notes in the third octave). Starting with the A on the fifth fret of the sixth string, and continuing to higher and higher notes until ending on the C on fret 8 of the thinnest string.
First just practice playing this sequence straight up and down, slowly, from the lowest note to the highest, then back. Really emphasize the root notes (hitting the A’s harder and lingering on them). Repeat until you no longer have to think about the shape and your fingers automatically go to the right place.
This is a two note per string shape, and I tend to use one finger per fret, so the fingering from lowest string to highest is first finger, pinky, first finger, third finger, etc.
Using the numbers 1-4 to refer to the fingers of the fretting hand, I finger it as follows: 1 4, 1 3, 1 3, 1 3, 1 4, 1 4.
That said, many, many terrific blues musicians almost never use their pinky. They use their 3rd finger instead and just stretch or shift their hand.
When learning any scale, I recommend you get in the habit of starting and ending any sequence on the root note. This helps to cement the sound of the scale in your ear.
The first position starts with the root as the lowest note, so if you just play all the way up and all the way back before pausing you’ll automatically start and end on an A.
One way to practice ascending is to start on the lowest A, proceed all the way up to the C on fret 8 of the highest string, then back up one note before stopping. When practicing descending, start with the A on fret 5, not with the C at fret 8.
Practice with a metronome! It’s also good practice to say the note names aloud as you play. Now try saying the scale degree aloud (allowing you to transpose the shape to any scale!).
More exercises for position 1
Everyone tends to play what they practice, and just going straight up and down the position doesn’t sound particularly musical. Guess how your solos sound if you only practice going straight up and down the scale?
The trick to making your practice sound more musical is to practice using patterns, not just linear progressions up and down the scale.
Pattern 1: Sequences of three
One of the easiest ways to sound more musical is to ascend and descend in little three note sequences. When ascending, instead of playing A, C, D, E, G, A, C, D, E, G, A in order, try this sequence instead:
[I plan to insert some tab for this here eventually.]
A C D, C D E, D E G, E G A, G A C, A C D, C D E, D E G, E G A, G A C.
Then do it descending:
C A G, A G E, G E D, E D C, D C A, C A G, A G E, G E D, E D C, D C A.
Try playing this with different rhythms. Triplets fit naturally, but it also sounds good played as 8ths (swung or straight).
Pattern 2: Sequences of four
Same thing, but this time groups of four.
Ascending: A C D E, C D E G, D E G A, E G A C, G A C D, A C D E, C D E G, D E G A, E G A C.
Descending: C A G E, A G E D, G E D C, E D C A, D C A G, C A G E, A G E D, G E D C, E D C A.
Pattern 3: Playing in thirds.
This exercise is more useful for practicing full seven note scales (minor/major and the modes) but it can also be applied to the pentatonic (or other) scales.
Instead of playing each note in order, you play a note, skip a note, play a note, back up to the skipped note, play it, etc.
So the ascending sequence becomes: A D, C E, D G, E A, G C, A D, etc.
Descending: C G, A E, G D, E C, D A, etc.
All of these sequences will be difficult at first, but they become easier each time you attempt them. There is no better way to really get the position under your fingers.
There are far more sequences than just these three, too. Try longer sequences, or larger intervals for example. Make up your own sequences.
Now learn the remaining four positions
This pdf document contains all the positions of the Am pentatonic scale. For your convenience, here are the remaining four positions:
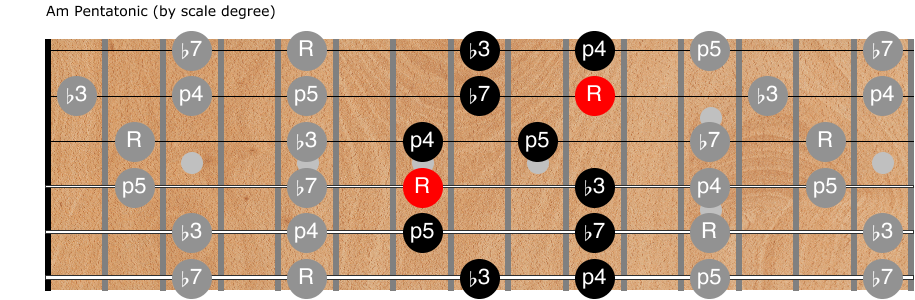
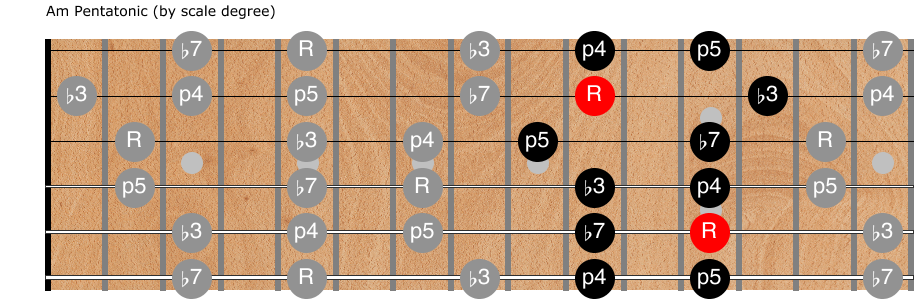
Practice each of the remaining positions in exactly the same way. It takes most people a week or two to learn all five positions. Just take it slow and practice just one position a day for a half hour or so.
It really isn’t that hard to learn all five positions. It just takes consistent daily practice, even if only a few minutes each day. Keep track of your progress in a journal, and try to practice a different position every day for a week.
Once you’ve got all five positions under your fingers (possibly with occasional stumbles) start trying to connect them.
Connecting positions
As should be obvious, each position shares notes with positions both lower and higher on the neck. The positions interconnect. Position 1 is adjacent to position 2 and position 5, for example.
Practice methodically switching between positions on different strings.
For example:
First play the lowest two notes of position 5 (G and A) on the low E string, then slide up to the the C at fret 8, then continue up position one.
Next switch on the A string. Play the first four notes of position 5 (G A C D) on the E and A strings, then slide up to the E and continue with position 1.
Then switch on the D, G, B, and e strings.
Now do it descending from position 1 to position 5.
Now do it using the 3-note, 4-note, and third-interval patterns we showed previously.
Now repeat the whole thing between positions 1 and 2. Then between 2/3, 3/4, and finally between 4/5.
These exercises will take you months (at least) to complete, but really you’ll never stop practicing them. Eventually they’ll become so easy you can do them in your sleep with no mental effort. They’ll basically just be warmup exercises, something you do before practicing other things that are more taxing.
One and two string drills
Many people get stuck in these five positions (or “boxes”) and have a hard time fluidly moving up and down the neck. Countless guitarists only learn “box 1” and never learn any licks outside of that one shape!
As hard as it is just to learn and KNOW the five shapes, it’s extremely important to understand how the shapes connect. Don’t think of an individual box or position as “the scale”. They are just bite sized chunks of the scale to make it easier to remember. The goal is to be able to fluidly play any note in the scale anywhere on the neck, and move between positions as easily as taking different routes home.
The previous exercises to connect the shapes are one good way to “break out of the boxes.” Another is to practice playing the scale on one, two, or three strings at a time, all the way up and down the neck.
First do it with just one string. Put on an Am backing track. Start on the high e string. Find the notes E, G, A, C, and D everywhere you can play them on that string. Try making up licks on just one string.
Use every trick in your arsenal: slides, bends, hammer-ons, pull-offs. Very your rhythms: whole/half/quarter/eighth/sixteenth notes. Try sliding up to a note from a half-step below. What about from a half-step above? How does that sound.
Try hard to make it sound musical. You don’t need to be playing notes continuously! Put in some rests occasionally, and let the music breathe.
You should find this a fun and easy exercise.
Now do it with the B string. Find all the A/C/D/E/G notes first. Does the different location of the notes on this string “feel” different? If you’re like most people, you’ll probably find yourself playing slightly different licks and phrases on this string than you did on the first one.
Now try it using both the B and E strings. Use the pdf if you have to, but visualize the top two strings of the five positions. Try to emphasize the root, ♭3, and ♭7 (the notes A, C, and G). Use the other two notes (D and E) as “in between” notes that connect the elements of your phrases.
Now try it with every string and groupings of two or three strings at at time (and they don’t all need to be adjacent to each other).
Spend enough time with these exercises and I guarantee you’ll have the pentatonic scale down cold.
Minor is Major
This entire post has been calling these five positions the Am pentatonic scale. It’s important to realize that these five notes (A, C, D, E, and G) can also be considered the C Major pentatonic scale. The exact same “shapes” can create either a minor sound or a major sound depending on which notes you emphasize.
The minor pentatonic scale uses the scale degrees, root, ♭3, p4, p5, and ♭7. By emphasizing the root note (A) you establish the key and overall tonality. When you emphasize the ♭3 (C) and ♭7 notes (G) you create a very minor sound. As we discussed, you can most easily emphasize a note by ending your licks on them.
The Major pentatonic scale uses the scale degrees root, M2, M3, p5, and M6. So C Major pentatonic uses the notes C, D, E, G, and A. Same notes, but when you end your licks and phrases on C and the Major 3 and Major 6 notes (E and A) the same notes sound very Major.
Try it! Put on an Am backing track, or just loop a single Am chord (or even just drone the open A string). Then play some short phrases from one of the pentatonic positions (or even on just one string) that emphasize A, C, and G (by ending on them, playing them louder/longer, bending up or down to them, whatever). That’s the sound of the minor pentatonic.
Now put on a C Major backing track or just loop a C Major chord, and play phrases emphasizing C, E, and A. Thats the sound of the Major pentatonic. It sounds sweeter and somewhat less poignant/sad to most people.
Here’s my attempt at that exercise. Not gonna win me any grammy’s, but hopefully you can hear the difference between the “minor sound” when soloing over Am and emphasizing the A, versus the “major sound” when soloing over C. Exact same notes and shapes, I’m just stopping on different notes.
This yin/yang thing where the same shapes/positions/notes can be used to create utterly different sounds confuses a lot of people (myself included). The trick (I think) is to build up a vocabulary of both minor and Major licks and phrases.
Please understand that Am and C Major are entirely different keys. If the chords in a song are, say, Am, Dm, and E7 (a minor blues, for example) then playing C Major licks might sound a little strange (but Am licks will sound great).
A Major and C Major are also entirely different keys! You play the A Major pentatonic scale by shifting the same 5 positions we’ve been playing three frets lower on the neck. In other words, if you take the shape of “position 1” and shift it three frets lower so your pinky is on the A on the 1st and 6th strings, you’re now playing a shape of A Major pentatonic.
Note that “position 2” of A Major pentatonic overlaps with position 1 of Am pentatonic (and so on, for all five positions).
Blues in particular intermingles the sounds of the major and minor pentatonic scales. Hammering on from the ♭3 to the M3, or from the M6 to the ♭7 sounds particularly sweet.
When you’ve got the minor pentatonic scale down to where you know it in your sleep, start experimenting with mixing major and minor pentatonic licks within the same key.
Equal rights for sharps and flats
So far we’ve only talked about the Am and C Major pentatonic scales, but other keys are just as important.
We’ve started with C/Am because the parent diatonic scales contain only the seven natural notes (no sharps or flats).
The C/Am pentatonic scales only use five of the seven diatonic notes, of course, and leave out B and F.
[C Major Pentatonic leaves out the p4 (F) and the M7 (B). Am Pentatonic leaves out the M2 (B) and m6 (F).]
There are 12 keys total (each with a relative minor, like C/Am, F/Dm, B♭/Gm, etc.). Songs are written in various keys and frequently transposed to different keys to match the vocal range of singers, etc.
It’s important to practice your pentatonic scales (and learn how they connect) in every keys, not just C/Am. You should feel equally at home playing Em pentatonic, for example, as you are playing Am pentatonic. Even though the locations of each position is utterly different (the “boxes” move dramatically between these two keys) the order of the positions and the ways they interconnect never change. The locations of the root notes within each “box” also never changes.
You need to KNOW where the roots are on the neck and be able to find the corresponding “boxes” or positions around each root note. You’ll never get there if you don’t practice in many different keys.
I recommend practicing the different keys in the order listed below, whether practicing pentatonic scales, full diatonic scales and modes, or other altered/unusual scales.
- C/Am
- G/Em
- D/Bm
- E/C♯m
- A/F♯m
- F/Dm
- B♭/Gm
- E♭/Cm
If you practice these eight (sixteen) keys thoroughly, you’ll find it easy to play in any of the remaining keys as well.
I’ve put them in this order based on the relative likelihood you’ll find yourself playing songs in those keys.
C/Am is first because, as discussed, they are the natural notes, the “white keys on a piano.” Millions of songs are written in C or Am.
E/A/D/G (major and minor) are “guitar keys”. Because the lowest four open strings are tuned to these notes, it’s easy to accompany yourself with bass line drones and open chords.
The keys of G and Em have only one note different than C/Am (G/Em uses F♯, not F). There are many, many guitar songs written in G or Em, so I’ve listed next after C/Am. Any of the open strings sound good when playing in G/Em.
Next up is D/Bm, because again any open string sounds a note in the scale. They have just two non-natural notes: C♯ and F♯.
E, A, and Dm (and their relative majors/minors) are next up in frequency of “guitar keys”.
I’ve included B♭ and E♭ because they are natural keys for some other instruments.
It’s worth practicing in every key, but to make your practice most useful for actually playing real songs, I’d suggest practicing them in this order.
Enjoy!