Here is a 29 minute exercise and tracking system to learn, REALLY learn, the pentatonic scale everywhere on the neck as quickly as possible.
Sorry for the clickbait headline, but you probably won’t be able to complete the entire exercise the first time you try it. It will likely take you at least a few days, but the tracking system ensures you will continue to make progress. After several days or weeks practicing this one exercise, you’ll be able to complete the exercise in 29 minutes for real. More importantly, you’ll be able to effortlessly find the closest pentatonic scale shape anywhere on the neck.
[This post is a follow-on to Learning to Solo.]
Why yet another exercise on the same topic?!!
I wanted to provide a concrete example of how I go about making efficient progress on a medium-to-long-term goal that can’t be mastered in a single practice session (specifically: learning the pentatonic scale everywhere on the neck).
We all want spoon-feeding. We secretly wish for an instructor looking over our shoulder every time we have a few minutes free to practice. We want someone who will recognize where we are weak and encourage us to practice what we need most right now (like a good elementary school teacher).
Sadly, there appears to be a scarcity of mind-reading guitar instructors with the patience of an elementary school teacher (and that are instantly available 24x7). Instead, we must devise our own systems for figuring out what to work on and how to track progress.
When we actually find time to sit down and practice, especially after a long break, it can be surprisingly hard to figure out what to practice right now. What is most important? Where am I weakest? Where did I leave off? Which of those umpteen internet videos and blogs was it that I wanted to work on?
It’s not at all uncommon to spend the entire practice session just noodling around with stuff you already know as you ponder the question of where to begin.
As I’ve written previously, even a simple question like “how and what should I practice” can be surprisingly complex to answer.
My personal practice regimen has evolved, but is now down to just three rules:
-
Maintain a list of the medium-term things I’m most interested in learning. They should be things that will take a few days to several months to learn. They don’t need to be in any order, and I can replace any item in the list any time I want. I just need to limit the list to no more than five items. I post the list prominently in my practice area.
-
Create a system to track progress for any item before I begin working on it. [That’s what this post is about.]
-
Follow the system for each entry. Every time I sit down to practice, I decide which of the five items I want to work on and for how long. I then follow the system for each of those items. If I want to work on more than one entry, I decide how much time to allocate to each. Whenever I can, I try to track my progress in a written practice journal (but I’m not as religious about this as I probably should be).
It’s simple, but it works for me. I feel a lot less overwhelmed about all the things I still need to work on. I also feel less angst about practicing inefficiently.
The second rule is pretty vague, though. How do you devise a system that ensures you make progress on something without repeating what you already know?
The systems I use vary. They may be something of my own design, or something I’ve pulled from one of my various teachers. Some systems are dead simple. Some are quite complex. The specific example in this post is one of moderate complexity that I find extremely useful.
A system for learning Am Pentatonic
The example system in this post is for learning the pentatonic scale everywhere on the neck (presuming that you don’t know it already).
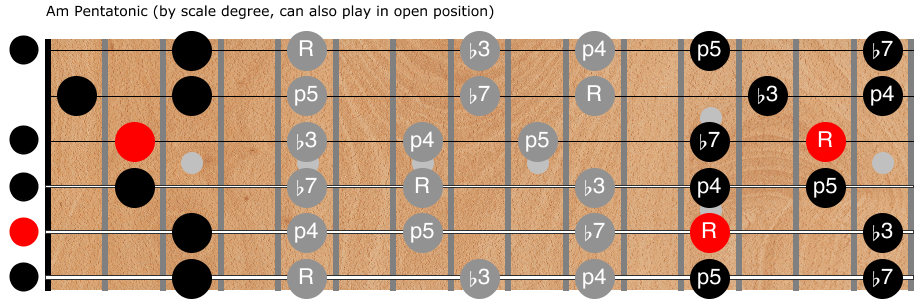
As we covered previously, the pentatonic scale for the key of Am looks like this:
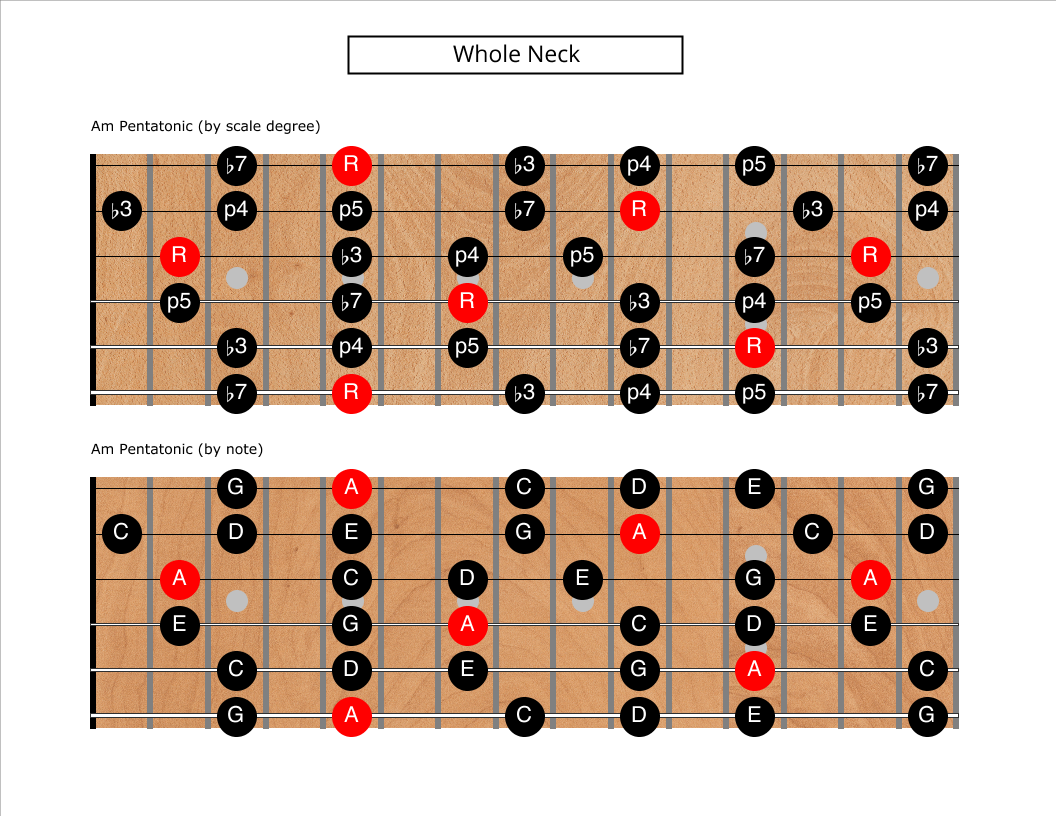
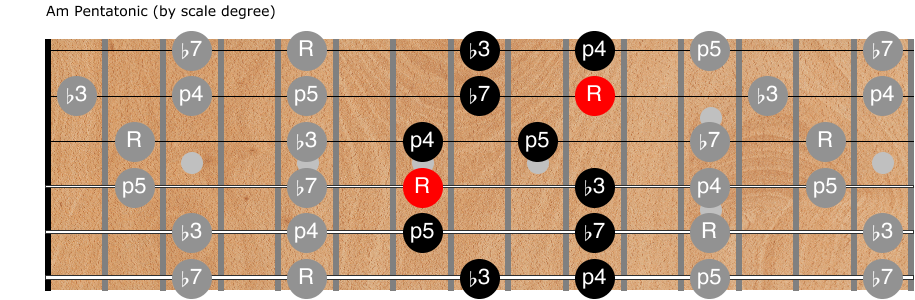
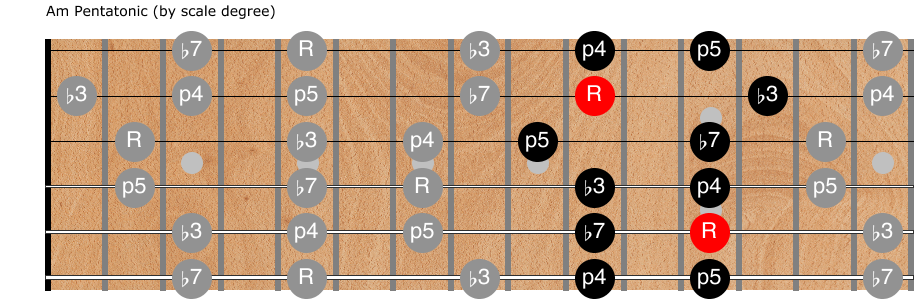
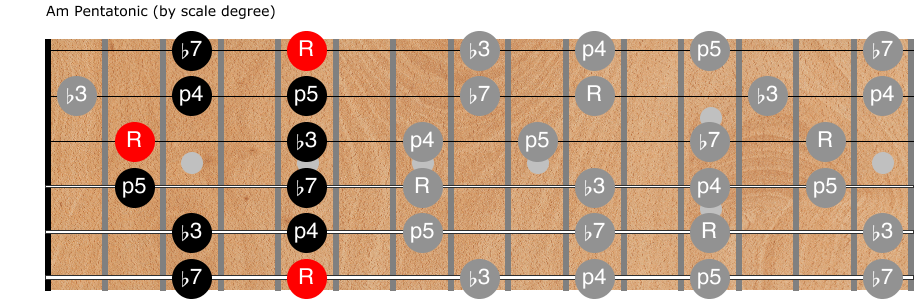
Obviously that’s too much to absorb all at once, so almost everyone breaks it into five different shapes or positions like this one:
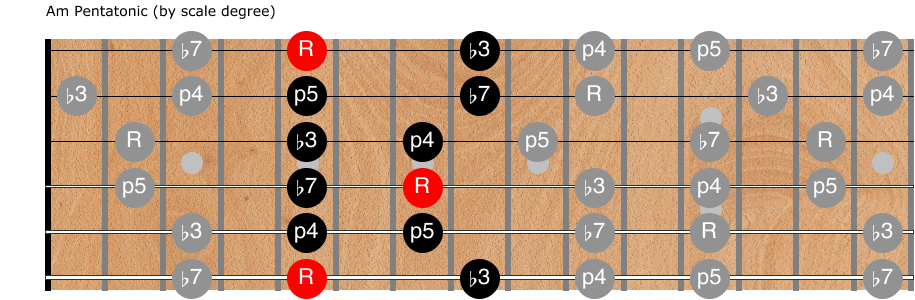
There are a million resources all over the internet with diagrams for all five positions (I’ve included diagrams in the REFERENCE section below) . But these diagrams and tabs are just tools and background information. What we need is a system.
What follows is a step by step description of the practice regimen (system) that I use to teach myself connected scale shapes, applied to the Am pentatonic scale.
This is an exhaustive description of something that only took me about 5 minutes to create, and no more than two or three sessions to fine-tune. Don’t let the length of the description scare you.
The system
Each day you work on learning the five positions, open your practice log and create a grid with three columns and five rows.
[I strongly recommend starting in the key of Am and sticking with just that one key for at least a few weeks. The pentatonic scale in the key of Am is the notes A, C, D, E, and G.]
In the first column, you write the position number and lowest note in that position. The other two columns are for tic marks as you complete portions of the exercise.
After the first day, the grid might look like this (assuming you didn’t complete every part of the exercise):
| 1: A | ✓ | ✓ |
| 2: C | ✓ | ✓ |
| 3: D | ✓ | ✓ |
| 4: E | ||
| 5: G |
You work through this grid left to right, top to bottom, ticking off boxes as you go.
The first column shows the position number and lowest pitched note in the shape.
The second column is for “1 minute review” of the corresponding position for that row in isolation (just playing it up and down, starting and ending on the lowest pitched root note).
The rightmost column is for “progressive connection drills” (described below — these are the meat of the exercise). The box in the upper right gets one minute. Each successive connection drill gets an additional two minutes: One minute for one position, three minutes for connecting two positions, five minutes for three positions, seven minutes for four positions, and a full nine minutes to connect all five positions together.
In gory detail, you’d proceed as follows:
-
-
Row one says to work on position one, which begins with A on the lowest string. First, find and play all the root notes in the position (there are three of them in position one). Then spend one full minute (with a timer!) re-familiarizing yourself with the shape, playing the position up and down, starting and ending on the root note.
Optional: Find and play Am chords near the shape.
After the minute is up, tic the middle box in the top row.
-
Now spend an additional minute just playing position one straight up and down, from the lowest note in the shape to the highest. Since we are only trying to memorize the shapes, it isn't necessary to use a metronome (but it never hurts!). Since we're starting with position one, the lowest note is the root note, so the practice for this sub-drill is identical to the first box.
After the minute is up check the rightmost box in the top row.
-
-
-
This row says to work on position two. Spend another full minute re-familiarizing yourself with this shape. Again, first find all the root notes, then play it starting and ending on a root note. Practice going in both directions, starting and ending on different root notes. Optionally find nearby Am chords.
Tic the box when the minute is up.
-
We will now spend three full minutes working on connecting positions one and two. Each time you start another row, add an additional two minutes to the "b" part of the exercise.
Start with the lowest note in position one, then ascend through all the notes in the position. Then slide up to position two on the highest string and descend through that position. Then slide down to position one and repeat. After a few cycles, reverse direction. Tic the remaining box on row two when the three minutes are up.
-
-
-
One minute reviewing position three.
-
Five minutes connecting positions one, two, and three. First up one, down two, up three, down two, up one, etc. Then reverse direction: down one, up two, down three, up two, ....
-
-
-
One minute reviewing position four.
-
Seven minutes connecting positions one, two, three, and four.
-
-
-
One minute reviewing position five.
-
Nine minutes connecting all five positions, up and down.
-
When first starting out you’ll probably find you can’t get through all five positions without exploding your brain. That’s perfectly okay. Just tic off the boxes you do complete so you can track your progress.
IMPORTANT: Start with a different position every day! Do not always begin your sessions with position one.
Starting with different positions each day ensures you spend equal time with every position. It also ensures you at least expose yourself to every shape, even though you may not have yet mastered the positions from previous sessions. This is especially helpful when you fail to complete the exercise for whatever reason: It’s important to practice all the positions equally, not position one seven thousand times and position five not at all.
For example, the second day you practice might start with the grid looking like this:
| 2: C | ||
| 3: D | ||
| 4: E | ||
| 5: G | ||
| 1: A |
This is an important practicing principle, whether you are practicing an exercise or trying to learn a song: if you always start at the same point you will get really, really good at the beginning bits but will invariably fall apart toward the end because you’ve practiced it so much less.
Far better (and faster!) to always start at a different point, even if you haven’t yet mastered the beginning.
REFERENCE
For your convenience, here is a pdf document with all positions of the Am pentatonic scale.
Continuing on
This system is good for any set of connected scales, not just Am pentatonic.
Once you can complete the entire 29 minute exercise at a reasonable tempo, and you feel you’ve got that first scale down everywhere on the neck, reward yourself with a beverage of your choice, then erase it from your five item list.
Your journey is far from complete, of course (truthfully, it never ends).
The next thing I’d suggest to replace it with on your list is the Am blues scale (A, C, D, E♭, E, G). These correspond to the scale degrees R, ♭3, 4, ♭5, 5, and ♭7. Obviously the Am blues scale is closely related to Am pentatonic, but you’ll probably be surprised at how much difficulty that one extra note creates!
It’s so closely related that most people consider the scales interchangeable and tend to “think pentatonic” and just throw in the blue note every now and then for spice. Even though the blues scale has six notes, everyone still thinks of it as having only five positions (ignoring the shape starting with the blue note in the lowest position).
Once you’ve got the Am blues scale licked (after another week or three) have another beverage and replace it with A Major pentatonic (A, B, C♯, E, F♯) and the A Major blues scale (A, B, C, C♯, E, F♯). The major pentatonic scale degrees are 1, 2, 3, 5, and 6. The “blue note” in the major blues scale is the ♭3.
You’ll discover the shapes are exactly the same, just shifted three frets.
Usually you will use minor scales over minor chords and entire songs/chord-progressions in a minor key. Similarly, you’ll normally use major scales over major chords and songs in major keys. The blues are special, though. Blues songs intentionally highlight the push and pull between major and minor sounds. The distinctive sound of the blues is primarily from playing notes from minor scales over a set of major chord changes (dominant seven chords to be precise).
After several weeks or months playing in A (major and minor) it will be time to move onto other keys. The system and the shapes are exactly the same, but each position will, of course be in a different location on the neck. This is where all that time spent locating the root notes and practicing how the shapes connect will really pay off. You should find it much easier to learn other keys once you have A down, but it’s not completely trivial, either. Every key requires subtly different fingering (and brain-work). You have to put in the time in every key (or at least the common keys of E, A, D, G, and C, Bb, and Eb). There is no shortcut.
Once you’ve got the major and minor pentatonic/blues scales down, move on to seven note scales: major and its modes like natural minor, melodic minor, and harmonic minor, for example. Seven note scales are often broken into seven positions, making it a 55 minute exercise, but the system works the same way.
One system that can be applied to a countless number of scales and many years of practice!
I hope you find this useful, please let me know if you do.