Arpeggios are just “broken up” chords, chords played one note at a time rather than all together. There are arpeggios for every chord type: major, minor, dominant, extended and altered.
I think it’s most useful to learn the dom7 arpeggios first before starting on other chord types, especially if you like the blues. (At least I hope so, since those are the only ones I really KNOW myself so far!)
The Basics
A dominant 7th chord comprises the scale degrees root, 3, 5, and ♭7.
A7, for example, comprises the four notes A, C♯, E, and G.
A standard 12-bar blues comprises nothing but dominant seventh chords (specifically, the I7, IV7, and V7) so it’s incredibly useful to learn how to (effortlessly!) find and play dominant seventh chords anywhere on the fretboard.
My teachers taught me five different two-octave shapes for dom7 arpeggios, but I tend to think of them in three buckets: two shapes with the root on the 6th string, two with the root on the 5th string, and one shape with the root starting on the 4th string.
For your convenience, I’ve created a pdf document with all five arpeggio shapes suitable for printing.
How long will it take to learn these five shapes?
Even though it will only take about fifteen minutes to read this post in its entirety, it will take many weeks, even months of practice to really learn all five shapes.
It took me two or three weeks just to get the basic shapes fully memorized, but doing so noticeably improved my playing almost immediately. I still practice them every time I pick up the guitar.
To put it in perspective, however, I still tend to stutter and think too much for some changes even though I’ve been practicing these arpeggios for several months.
Nonetheless it’s important not to go too slow. In particular, I think it’s helpful (and motivating) to memorize the 6M, 5M, and 5P shapes as quickly as possible. You can make a lot of music with just those three shapes, and it makes sense to learn them thoroughly before adding the two remaining shapes. Any one shape alone isn’t all that useful, but getting just these three down helps you make melodic solos pretty quickly.
A realistic schedule would be to memorize the 6M pattern on the first day of practice, using drills 0 through 5. Then memorize 5M on the second day, even if you didn’t get through all 5 drills the previous session. Next, study 5P on the third day.
Spend at least a week with just those three shapes, going through the changes in a 12-bar blues with them (drill 5). For the first week or three, just ascend from the root on each chord change. In subsequent weeks, practice descending from the highest note of each shape. Then change in the middle. All of these exercises are described below.
In my case, I was able to ascend with all five shapes through the 12-bar blues after three or four weeks. Descending (not starting on the root) was harder and took me another couple weeks. I’m still working on being able to change in the middle of a shape using any/all of the shapes.
It’s a real accomplishment to get all of this down!
Shape 6M
The first arpeggio shape you should learn has the root on the 6th string. I’m going to call this shape 6M (6th string root, starting with the middle finger):
Drill 0 (memorizing the shape)
Practice playing this shape starting with the A on the 6th string. Use your middle finger to play the A, then your index finger to play the C♯ on the 5th string. Continue ascending through the pattern to the highest note, the C♯ on the first string, then back up and descend to the G on the 6th string. Finally, end by playing the root note on the 6th string again to complete one iteration.
Repeat ascending and descending as many times as you can stand, but always start on the lowest root note and end on any root to keep the sound of the chord in your head (really listen for that sense of resolution when you end on the root).
Initially, don’t worry about a metronome. Just play rubato (out of time) to get the shape under your fingers. Repeat until you don’t have to think about where to put your fingers for the next note.
Drill 1 (with a metronome)
Once you think you’ve got the shape down, prove it to yourself by playing with a metronome. (There’s nothing quite as humbling as a metronome.)
Start at a nice slow tempo like quarter notes at 60 bpm. Then start building up speed by slowly cranking up the tempo on the metronome by about five or ten BPM at a time.
Once you can play quarter notes with the metronome at 200 BPM, slow it back down to 60 and play 8th notes. Then triplets. Then 16th notes.
Drill 2 (starting on different notes and changing start direction)
Once you can play it straight up and down at a fairly quick tempo, try starting on the highest note in the shape (the C# on the 1st string) and descend from there at the beginning of each iteration. Your brain knows you’ve already practiced descending from there when you turned around a the highest note, but it may surprise you how much your fingers struggle to start at a different place in the pattern!
Push yourself by placing a finger on any note in the shape on any string, then ascending or descending from there.
Drill 3 (pattern drills)
Next, use the same techniques we’ve discussed to learn scales: play patterns. First try strings-of-three-notes, then strings-of-four-notes. Then try every-other-note. The goal is to have the shape completely in your muscle memory as well as instantly “visible” in your mind’s eye on the fretboard.
These drills should sound quite musical, by the way, which means they are particularly excellent practice. You play what you practice, and pieces of these drills make great licks for real solos.
Drill 4 (different chords — “magic fingers do your stuff”)
When you think “A7” your brain should instantly “light up” the A on the 5th fret of the 6th string in your mind’s eye. As soon as your middle finger is planted on that note, you want to be able to see the entire two-octave shape right there at the fifth fret, without having to think about it.
Your fingers should find the right notes in A7 all on their own, almost without conscious thought. Seriously, after less practice than you might think, your fingers sometimes seem to know where to go before your brain does — it still surprises me when this happens.
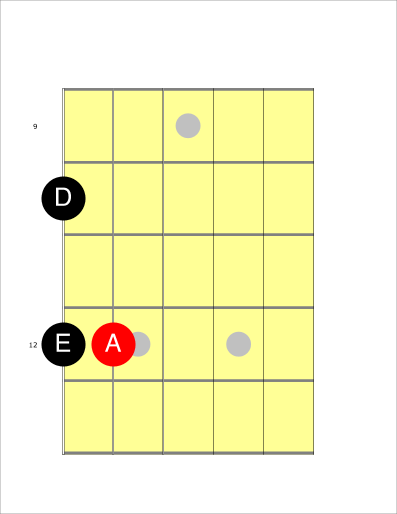
Now that you can play A7, try shifting the shape up to the 10th fret and play D7.
Then play E7 at the 12th fret. Same shape, but because the frets get closer together higher up the neck, it will feel different (and you must practice the shapes everywhere you can reach).
A7, D7, and E7 are the I7, IV7, and V7 for a blues in A. Let’s use this to play a blues!
Drill 5 (12-bar blues, ascending from the root of each change)
One very good drill is to keep looping through all 12 bars of an A blues (with a quick-change and turnaround) using just this one shape. Here are the changes for a 12 bar blues:
A7 D7 A7 A7
D7 D7 A7 A7
E7 D7 A7 E7
Play each bar with eighth notes (eight picked notes for each 4/4 bar). You’ll struggle at first to play in time and keep track of where you are. Once you get better at it, try playing the drill over a backing track.
You’ll have the shape down when you can play all 12 bars ascending from the root on each chord change.
Once you get good at that, make it more difficult. Instead of ascending from the lowest root, start each new chord by descending from the highest note — in time and with a metronome.
Shape 5M
As we saw, the IV7 chord in an A blues is D7 (comprised of D, F♯ A, and C). There is a D right there at the fifth fret just one string over (on the 5th string) so the next arpeggio we will learn is D7 in what I’m going to call the 5M shape:

Practice getting this shape under your fingers in exactly the same way you did the 6M shape. Start with the lowest root, this time the D on the 5th string. Then play the F♯ on the 4th string, etc.
Notice how the first five notes in this shape are exactly the same as the 6M shape. Once we reach the F♯ on the 2nd string, though (the M3) the shape changes because of the tuning change.
Now realize that you can play the V7 arpeggio simply by sliding this shape up two frets (same shape, but starting at the 7th fret:.
You can now play the entire 12-bar blues quite a bit more efficiently. Instead of jumping way up to the 10th fret with shape 6A, you can leave your hand at the 5th fret and just move over one more string to play D7. Then shift up two more frets to play E7.
Practice this!
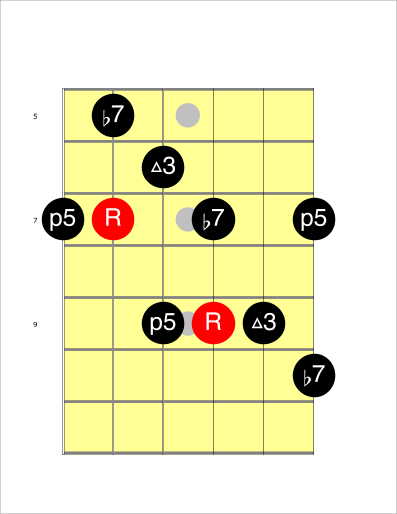
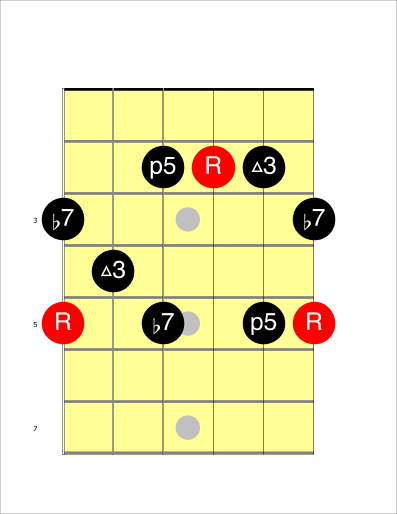
Shape 5P
With one more shape, we can make things even more efficient and avoid moving up the neck at all. The V7 in A is E7, which is the notes E, G♯, B, and D. Shape 5P uses your pinky to play the root instead of your middle finger:
Once you’ve got the shape down with drills 0-4, practice playing through the changes of a 12-bar blues using all three of these arpeggio shapes (6M, 5M, and 5P):
Play A7 starting with your middle finger on the 6th string root at the 5th fret, D7 with your middle finger at the fifth fret but now on the 5th string, and E7 starting with your pinky on the 7th fret of the 5th string.
The 1-4-5 “L” shapes
Remember the interval relationships on the fretboard with standard tuning: you can find a fifth by starting on the root, moving to a higher string and up two frets. Alternately, you can find the fifth by moving to a lower string on the same fret. The 4th is always two frets lower than the 5th.
If you look at the root notes for the I, IV, and V chords in the key of A (the notes A, D, and E) you’ll see they make a sort of inverted and backward L shape on the fretboard.
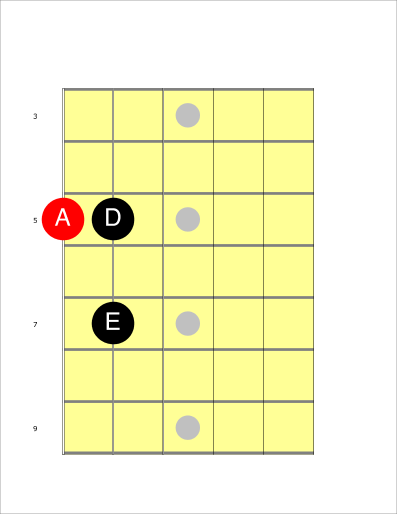
That pattern is incredibly helpful when navigating through a blues in any key. If you can find the root of the I chord on the 6th string, you can instantly find the roots for the IV and V chords just with that inverted L shape.
There is also a normal L shape you can use when starting with the root on the 5th string.
Try playing an A blues using the 5M form of A7 at the 12th fret, then D7 at the 10th fret using shape 6M, and E7 using 6M at the 12th fret. Try alternating between the root on the 6th string and the root on the 5th string.
Two fret shifts are trivial to play in time, but that’s not the most efficient way to play. There are only two more two-octave dominant 7 arpeggio shapes to learn, and then you can play through the changes anywhere on the neck with almost no shifting of positions (unless you want to — sometimes position shifts sound cool!).
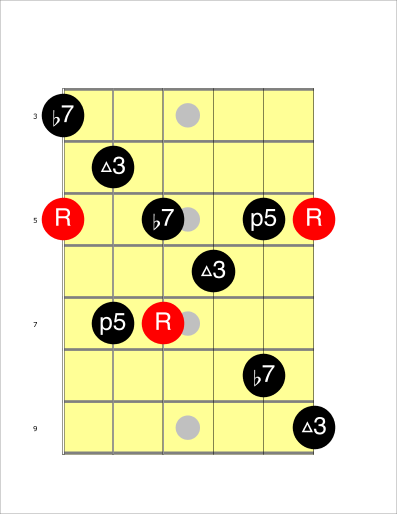
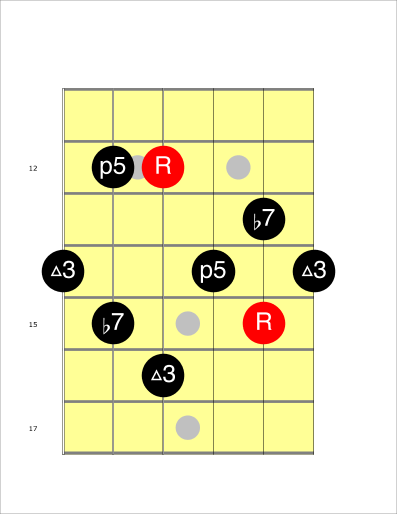
The 6P shape
We learned two arpeggio shapes on the 5th string, one starting with the middle finger, and one starting with the pinky.
As you may have guessed, there is also another way to play an A7 with the root on the sixth string but starting with your pinky:
Practice this shape the same way as all the others. To play efficiently anywhere on the neck though, you’ll need to learn one more shape.
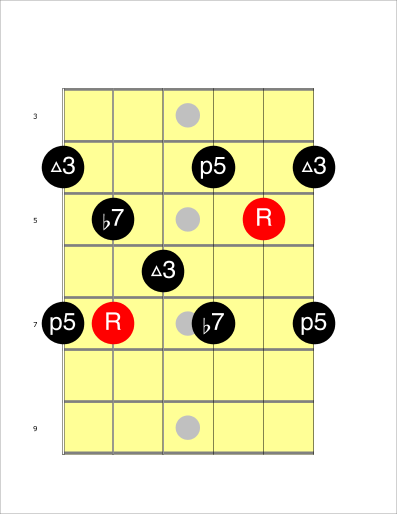
The 4I shape
As you practiced playing the 12-bar changes, you may have noticed that sometimes when you’re currently playing on the 5th string, the closest root note of the chord you’re going to is on the 4th string rather than the 6th.
If you’re playing an A7 using 5M at the 12th fret, the closest D is one string over on the 4th string at the same fret (not two frets lower on the 6th string).
We already learned how to play one shape with the root on the 4th string. Remember that these are two octave arpeggio shapes. The 6M shape can also be thought of as a “4R” shape (4th string ring finger).
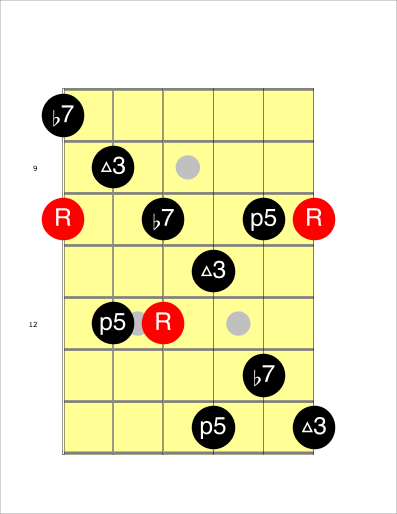
But that requires a position shift with your left hand if you’re already up around the 12th fret.
The 6M/6P and 5M/5P shapes have a nice symmetry to them. The “M” shapes have most of the notes up higher on the neck, and the “P” shapes have most of the notes lower down the neck.
Since 6M is also sort of 4R, we’ve already got a shape where most of the notes are lower down the neck, but what about a 4th string root shape where most of the notes are up higher on the neck?
Enter shape 4I, the final dom7 arpeggio shape to learn:
Go about learning this shape in exactly the same way (drills 0 through 5).
As an aside: shape 6P is also a two octave shape, of course, but the other root is on the 3rd string. So just like 6M is also 4R, 6P can be thought of as 3I. Similarly, 5M is also 3P, 5P is also 2M, and 4I is also 2R (the way most people play it).
That’s way too complicated, though. There are only five unique two-octive dom7 shapes. They are named based on the lowest root note in the shape.
Practicing all five arpeggio shapes
Once you’ve got all 5 shapes under your fingers, practice playing over the 12-bar blues everywhere on the neck.
It pays to be methodical.
I recommend sticking with one key, say A, for a few weeks. First go through the blues starting with 6M at the fifth fret, then with 6P. Try to minimize your hand movement, but don’t feel locked in — it’s totally legitimate to move your hand to a different position if its done intentionally for effect.
Next start with the A on the 5th string at the 12th fret: first starting with 5M, then starting with 5P.
Lastly use the A at the 7th fret of the 4th string. First using shape 4I, but then remember that you can also use shape 6M (4R) for this root.
Now start practicing in other keys. Remember to just use the “L” shapes to find your way around. I’d stick to “guitar” keys like E, A, D, G, and C for quite while, but it’s worth putting in time in every key.
Know the scale degrees and add some spice with chromatics and scales
Practicing arpeggios is particularly helpful for learning intervals and scale degrees. It’s important to know the function of every note you play as you go through the shapes. A given note is always either a root, third, fifth, or ♭7. Don’t just play the shapes blindly, also know the function of every note you playing.
When soloing, the notes in the underlying chord are the sweetest. They should be emphasized and will always sound great. Playing arpeggios means you are only playing chord tones. You’ll almost always want to end a lick or phrase on a chord tone, but oten you’ll want to add a little spice along the way.
If you only play chord tones, it can start to sound little cloying. It’s kind of like eating only sweet desserts: eventually you start to crave something savory.
There are several tricks you can use to spice up the sound.
Spice #1 (the ♭3)
The first and most important spice in a blues context is to hammer, slide, or bend up from the ♭3 to the M3 (AKA ▵3).
Identify the major 3rds in each of the 5 shapes, then practice hammering-on, sliding, and bending up to those notes from one fret lower.
Spice #2 (the M7)
In general, 3rds and 7ths are the key notes. They are what create the quality of the sound. The root and fifth are much less important and surprisingly can frequently be omitted altogether! The ♭7 is always two frets lower than the root (or two strings higher).
The next thing to try is playing the chromatic note between the ♭7 and the root (the major 7th AKA M7 AKA ▵7). Playing it by itself or ending a phrase with it won’t sound good at all, but try using it as a passing note as you move between the ♭7 and root (or vice versa).
Spice #3 (scale notes)
Chords are formed from scales.
The scale for dominant 7 chords is built from the fifth degree of the major scale (called Mixolydian mode). The Mixolydian mode comprises scale degrees 1, 2, 3, 4, 5, 6, and ♭7.
Remember that dom7 chords are major chords with a major third. It will always sound good to throw in other notes from any major scale.
The major pentatonic scale is particularly useful, especially when you are playing over the I7 chord.
| Mixolydian mode | 1 | M2 | M3 | P4 | P5 | M6 | ♭7 |
|---|---|---|---|---|---|---|---|
| Dom7 Arpeggio | 1 | M3 | P5 | ♭7 | |||
| Major pentatonic scale | 1 | M2 | M3 | P5 | M6 |
Any of the notes from the Mixolydian mode will sound good over a dominant chord (especially the I7 chord in the blues).
The arpeggio just uses four of the notes from the parent scale, the pentatonic scale uses five of the notes. Note that the Major pentatonic adds the M2 to the arpeggio, and lowers the ♭7 a fret to a M6.
Now go through each of the arpeggio shapes, and find a familiar major pentatonic shape that overlays the position.
Try switching between playing the arpeggio and major pentatonic licks. This can be a bit of a brain buster, but eventually you should be able to visualize the major pentatonic scale overlayed on top of the arpeggio. You should be able to quickly “see” both.
Spice #4 (chromatic approach notes)
It turns out that used the right way and at the right time, literally any of the twelve notes can sound good.
We’ve already discovered that the notes you and a phrase or lick on should almost always be a scale degree, and that its okay, even desirable to play notes outside of the chord tones as you approach those ending notes. Notes from the parent scale will always sound fine as these approach notes, but you can even use approach notes that are completely outside the scale.
The easiest way to add “outside” notes is with passing chromatics. Simply slide, hammer, or bend from one fret lower or one fret higher than the note you’re targeting.
Try it. Put on a backing track and play dom7 arpeggios as you’ve been practicing. Instead of strictly sticking to eighth notes, though, play with the rhythm a bit and try sliding up to some of the arpeggio notes from a fret below.
Now try it from a fret above. Try it on and off the beat and with every note in the chord.
Spice #5 (enclosures)
Next up is enclosures: you first play a higher note, then a lower note, before finally hitting the target note (“enclosing” the target note with notes both higher and lower on the neck). They are particularly popular with jazz players, especially bebop.
I’m not 100% sure about this, but I think enclosures always use the chromatic note exactly a half step below. The higher note, though, is usually the higher scale degree (but I think it can also sometimes just be a half step above, not necessarily the next scale degree).
Try playing the 4-♭3-M3 enclosure, for example, instead of just playing the M3 (enclosing the M3 a half-step above and a half-step below). Or the R-6-♭7, enclosing the ♭7 a whole step above and a half-step below.
Experiment. Have fun!