This is a follow-on to my last post about connecting pentatonic shapes, and part of my never ending quest to really learn how to solo.
As always, the goal is to play music (sounds) not memorize shapes or terminology. Specifically, we want to be able to play the five notes of the pentatonic scale, instantly and effortlessly.
It’s all too easy to get so wrapped up in theory and names and the analytical, verbal, mentally straining aspects of music that you lose sight of the goal (believe me, I have this problem in spades).
Ideally, you only want to think in terms of sounds while playing music. You want your fingers to automatically know where to go when you think of the sound you want to make. You’ll get there sooner than you might think if you keep practicing, and it’s a very cool feeling when your fingers just seem to automagically know where to go.
In the interim, though, its better to use visual and tactile cues (shapes) rather than linguistic/analytical cues (names and terminology from music theory). Using visual shapes and tactile grips to pull things out of your memory is much easier than using more verbal/analytical things like “box 4 of the minor pentatonic scale”.
Visual/tactile cues are easier on your brain. It’s why we often describe music with terms like colors and textures.
Theory and terminology are useful for preparation, organizing your thoughts, learning, exploring, and communicating with others, but thinking about theory and names just gets in the way while actually playing music.
Specifically, this post is about using chord shapes to recall entire pentatonic scale shapes, rather than the abstract names for the patterns. The term “box 4,” for example, has no musical meaning so using that name to recall the shape isn’t as useful to me as “seeing” the minor chord shape within the pattern as my index into the shape when dredging it up from memory.
What follows is a visual, shape-based practice regimen for learning the pentatonic scale that I’m currently following myself. I’ve found it has improved my playing dramatically.
Prerequisites to KNOWING the pentatonic scale
The first pre-requisite is to learn the note names everywhere on the fretboard. It isn’t quite necessary to completely KNOW the entire fretboard, but you should be able to find any natural note (A, B, C, D, E, F, or G) on the top three strings quickly and without too much effort before proceeding.
The second pre-requisite is to learn the major and minor triad shapes on the top four strings (we will be using 4-string chord shapes that have the same note on the D and E strings — octave drop shapes). I’ve covered triads exhaustively in the resources section of this site. While it’s good to learn everything eventually, I recommend ignoring diminished and augmented triads for now, and just focusing on major and minor triads on the top four strings at first.
It may seem weird to call four note chord shapes “triads,” but each shape only contains three unique notes. With four strings, one of the notes within the triad gets doubled (this should be familiar if you practiced your “octave drop” drills).
Instead of triads, some people prefer to think in terms of full six string CAGED shapes. There is nothing wrong with this, but since solos usually use notes up on the thinner strings, I prefer triads on those strings rather than full barre chords that are rooted on the fifth and sixth strings.
CAGED also focuses primarily on major chord shapes. Minor chords are possibly even more important when it comes to pentatonic scales since the minor pentatonic scale is commonly used over both major and minor chord progressions, but the opposite is not true (the major pentatonic scale will usually sound awful over minor chords).
Regardless, you should be able to easily play major and minor triads for any natural root note (ABCDEFG) on the top four strings (DGBE) before continuing.
Exercise 1: Triad finding drill
Even though we’ll be using the top four strings to form chords below, it’s not as important to know the note on the D string as it is on the top three strings. This is because the chord shapes we use double the same note on the lowest (D) and highest (E) strings. Therefore we only need to practice finding notes on the top three strings.
Start with minor chords. Work through the short cycle-of-fourths (BEADGCF) in order. For each note, find the minor triad inversion on the GBE strings as low on the neck as possible. Then find the note from the E string an octave lower on the D string, then play and memorize that 4-string shape.
Let’s say you’re on the note B. You first need to find the note B as low on the neck as possible. The open B string doesn’t work, because the remainder of the B minor triad (the note B D F♯) with the root on the second string needs notes below the nut. So the lowest place to find a triad on the neck is the root inversion with the B on the G string at the 4th fret. Now double the F♯ on the E string an octave lower on the D string at the 4th fret. Play and memorize this four string shape while saying “B minor”.
Next find the next Bm inversion up higher on the neck and repeat the process. Continue finding inversions as high up on the neck as you can comfortably reach. There are only three unique 4-string triad shapes for each root note, but you should be able to reach at least four different positions on the neck (on an electric guitar).
Once you’ve found all three shapes in different places on the neck, practice moving between them quickly, jumping around at random. Try to “see” the root notes in each position and use them to navigate.
Now repeat the process with the rest of the natural notes, proceeding through the cycle of fourths.
The Pentatonic Shapes
Note that I call these “the” pentatonic shapes, with no distinction between major and minor shapes. There are only five shapes, and each one can be either major or minor depending how you use them.
The notes in Am pentatonic are A, C, D, E, and G. These are the same notes as C Major pentatonic (C, D, E, G, and A) but each note sounds and functions differently depending on the harmonic context. “Harmonic context” just means what chords are playing in the background, or which note “feels” like the root note (home base).
If the chord you play over is Am, and/or the phrases you create with those five notes end on and emphasize the note A, the melody will sound wistful and sad (or “minor”).
If you play over C Major or the phrases end on and emphasize C, the melody will sound sweet and happy (“major”).
Let’s first look at these five notes in an Am context all over the neck:
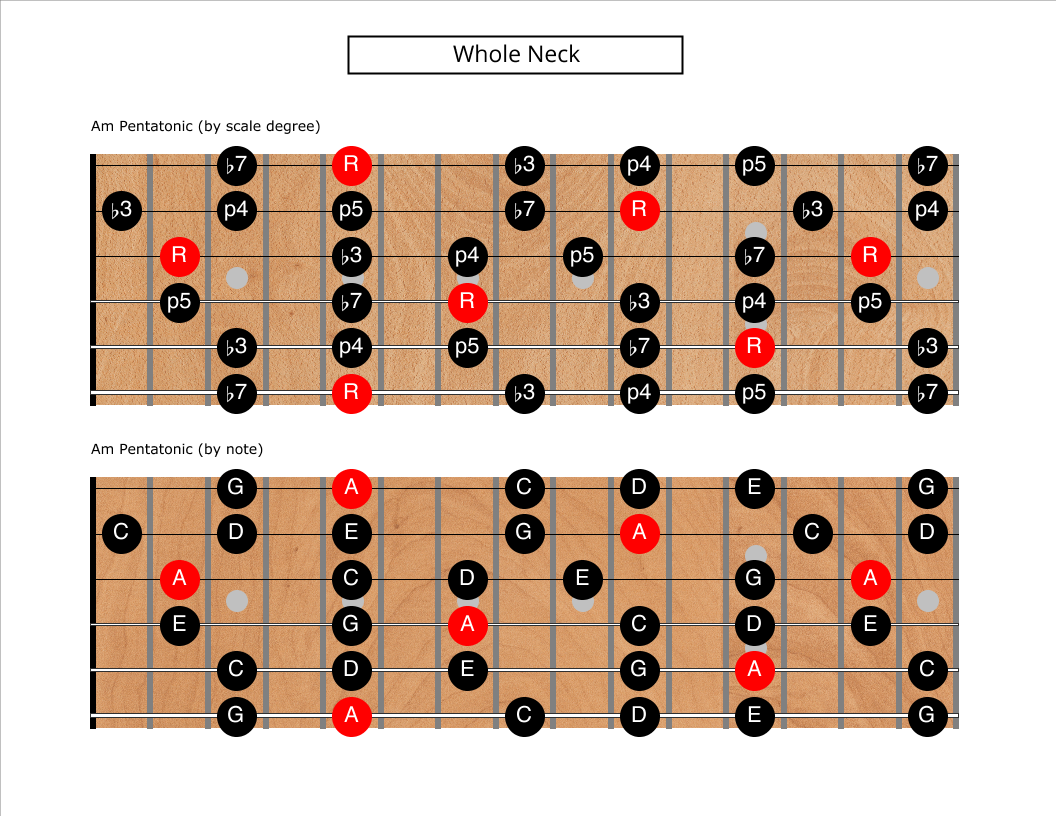
This diagram is intractably complex and way too much to keep in our memory in one chunk. We need to break it down into smaller, more tractable pieces.
Above and Below Concept
Before we do so, however, I’d like you to notice something important:
If we start on any A, we can find a C either three frets higher on the same string, or two frets lower on the next string (remember the fret shift when moving between string 3 and string 2, however).
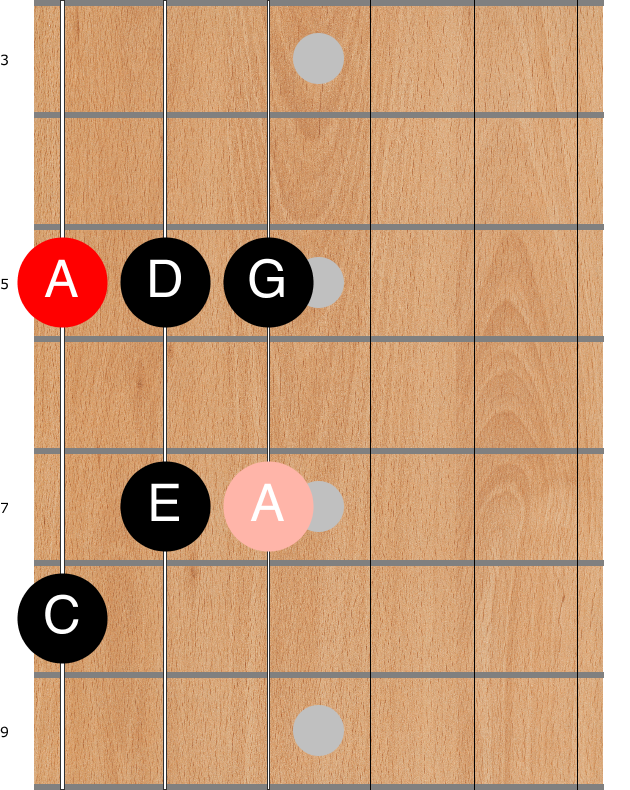

Note that shape 1 starts with your first finger on the root note, and the remaining notes on the same or higher frets.
Shape 2 has your pinky on the root note, and the remaining notes lower on the neck.
You can use this fact to great advantage: The note you’re looking for is almost guaranteed to be close to either your index finger or your pinky. Since your hand already spans four frets, you shouldn’t need to move your left hand very far up or down the neck to get into position for any root on one string or another.
Let’s just think about the A on the sixth string as shown. If my left hand was anywhere around the middle of the neck (say with my first finger around frets 4, 5, or 6) I could play the single octave shape 1 without moving my hand even a fret: just use my index finger to fret that low A.
If my hand was lower down on the fretboard, I’d choose octave shape 2, using my pinky to fret the sixth string A.
If my hand was even higher on the neck, I could use shape 1 starting with my index finger on the A on the D string, or shape 2 with my pinky on the A at the 12th fret of the A string.
Watch the pros and notice how efficiently they move their hands. Their hands always seem to be in the right place for the notes they want to play. Their ability to choose shapes that hang higher or lower relative to a nearby target is what allows this efficiency.
Multi-octave “box” shapes
Now take a look at “pattern 1” or “box 1” of the Am pentatonic again (repeated here for convenience):
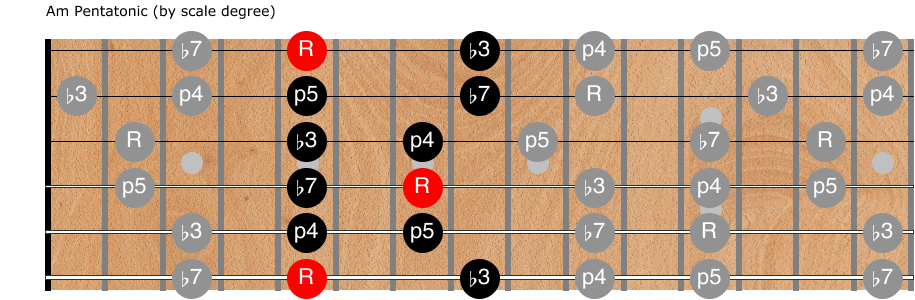
Notice that this multi-octave pattern has both one octave shapes within it. It starts with the one-octave shape 1 pattern, then continues with shape 2 (again with a one fret shift on the second string). Then it starts over again with shape 1 on the first string, then we run out of strings.
All of the pentatonic shapes work the same way. They are all just combinations of the one-octave shapes!
Learning the two one octave pentatonic patterns (AKA the frying pan) is pretty easy and fun, and shouldn’t take you more than a single practice session to learn.
Unfortunately, there are five different multi-octave shapes, each starting on a different note on the lowest string. Memorizing all five multi-octave shapes takes a bit more effort. Expect to spend about a week or two of daily practice just to remember the basic shapes, but real mastery will take many, many months.
We don’t want to think too much about names, but it’s worth pointing out that the most common naming (numbering) strategy is based on the lowest note in the shape.
For example, the diagram above is labeled “pattern 1” since the lowest note in the shape is the root or first note in the scale. The next shape higher on the neck would be called “pattern 2” since it starts with the note C, the 2nd note in the scale.
The problem with this naming strategy is that the same shape needs two different names. The name changes depending on whether we are thinking “major sound” or “minor sound”. Is the shape in the previous diagram “Am Pentatonic pattern 2” or “C Major pattern 5”? The answer is: “It’s both”.
I find it confusing to have two different names for the same shape. Expending mental energy remembering two names for the same shape makes playing music even harder.
In practice, most people don’t think about shape names when soloing (their brains are too busy thinking about the sounds of chords, arpeggios, and scales). Again, the verbal/analytical part of your brain should mostly shut down when improvising.
How to think about scale shapes while playing
Instead of thinking “pattern 1” or “box 4,” most people first “see” (in their mind’s eye) a chord/arpeggio nearby on the fretboard. They then use that chord shape as the index or hook into their memory, dredging up the scale shape that overlays the notes of that chord. It’s a visual, pattern based recall, not a linguistic lookup going on in their head.
The visual shape on the fretboard and visceral feel of the chord under their fingers is the index, not the verbal name of the shape.
Because solos are mostly played with higher pitched notes, I think it’s most helpful to “see” chord shapes on the thinnest strings. Instead of thinking about giant five or six string barre chords rooted on the sixth or fifth strings, it seems better to “see” triad shapes on the top three or four strings.
It’s impossible to write this article without giving the shapes a name however, so I’ve chosen to name them based on the minor scale. I will always refer to the shape above as “box 1” or “pattern 1” whether or not it is being used in a minor context.
The Five Boxes
Enough talking!
Below are the five individual multi-octave boxes or patterns of the pentatonic scale. (I’ve also created a pdf document with all five shapes for your convenience.)
The leftmost diagram in each set is the basic shape of the box, with the “blue note” indicated as a blue triangle. Note that the blue note is the ♭5 in a minor context, but the ♭3 in a major context. Either way, the location of the blue note is the same in either context! You can safely ignore the blue note when first memorizing the patterns, but eventually you’ll cherish the extra spice those notes provide.
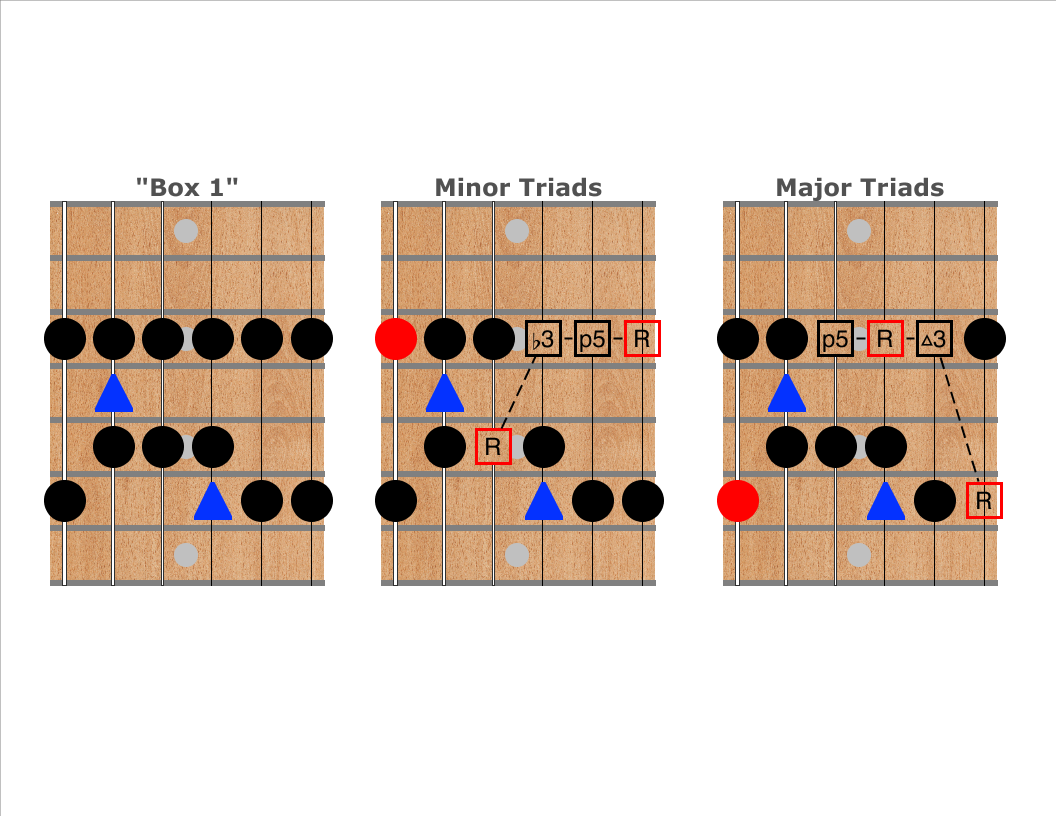
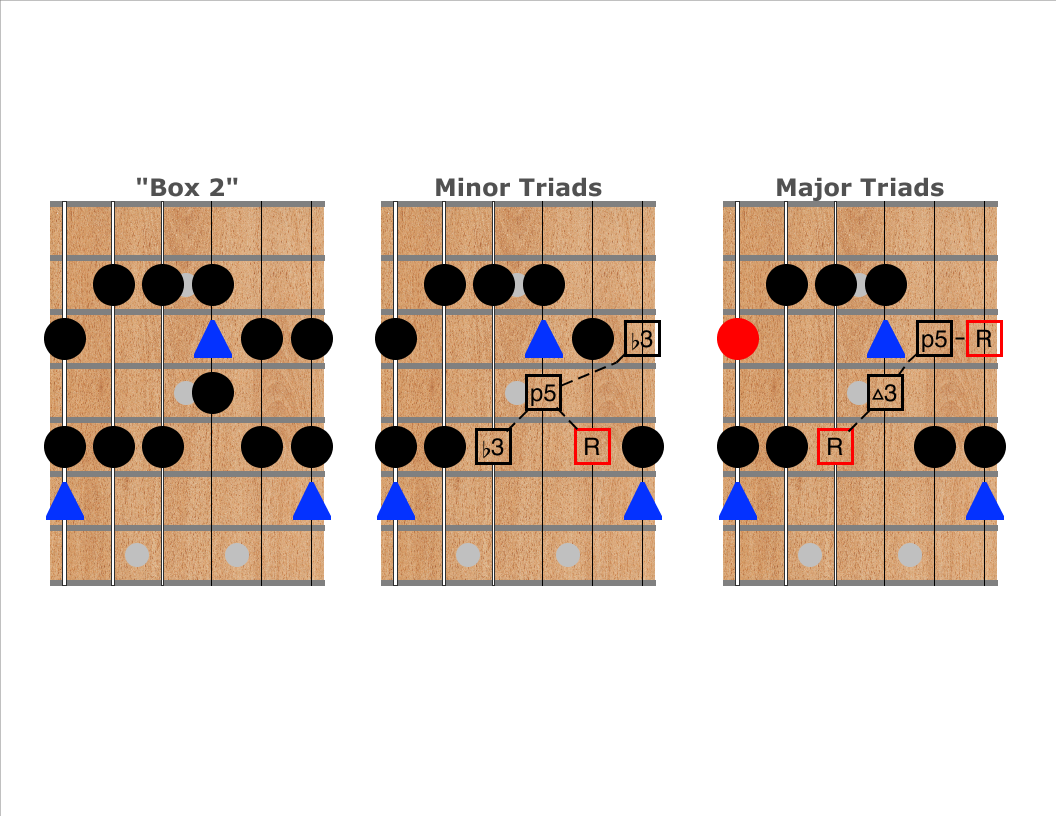

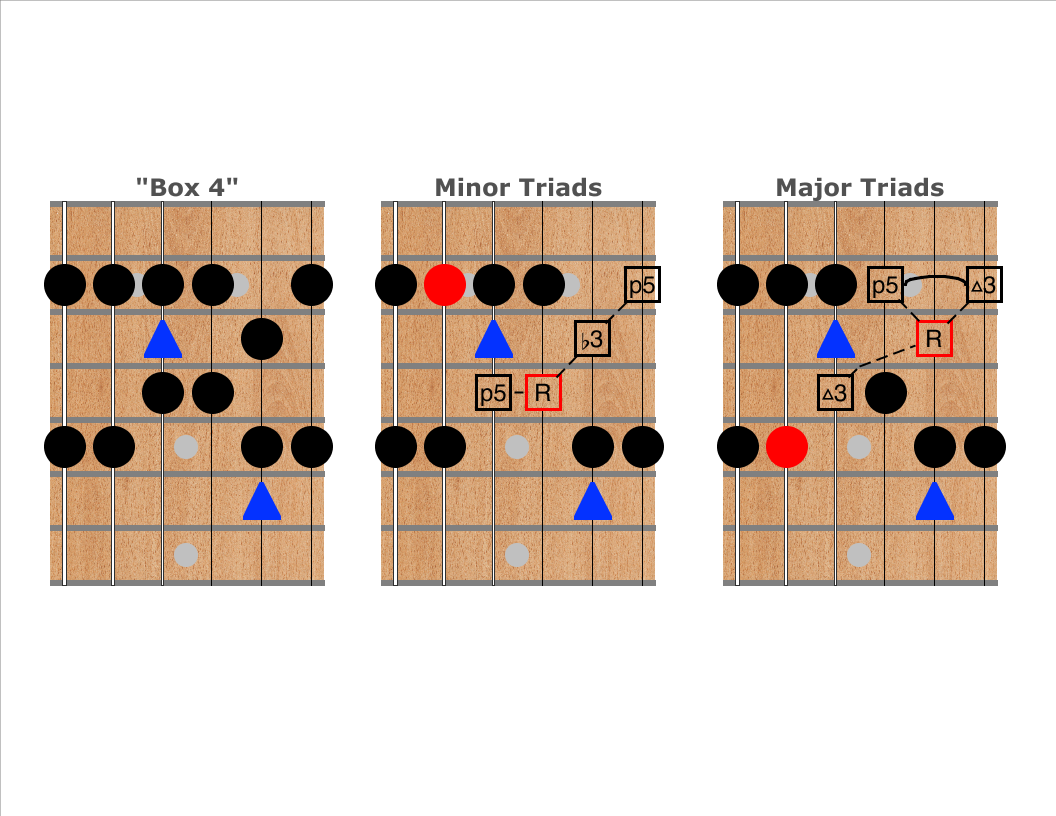
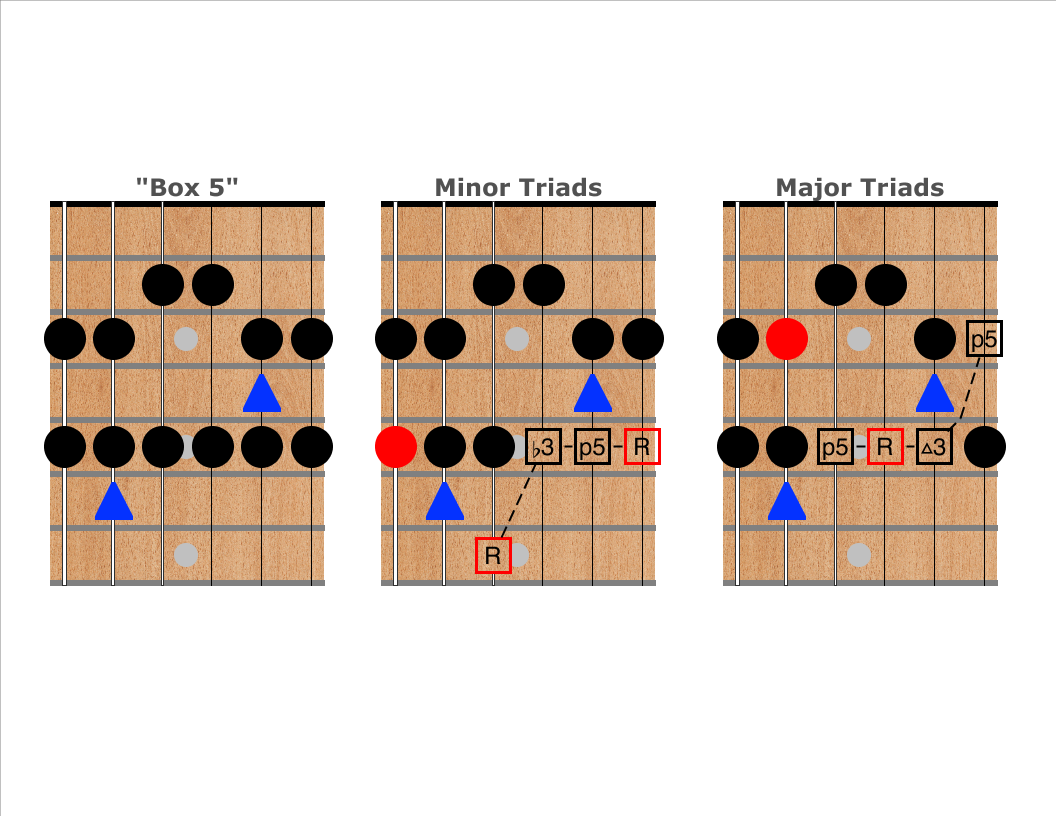
Note that I’ve not indicated the root note in the basic shape diagrams (the leftmost diagram in each row) because the root note depends on whether you are using the shape in a minor or major context!
The second and third diagrams show where minor and major triads appear on the top four strings nearby or within the scale shape. Notice that each box shape contains both major and minor triads! Again, the same box can be major or minor depending on which notes are emphasized.
The minor triad shapes in boxes 3 and 5 don’t fall completely within the basic scale shapes. As we’ll see, this is actually a good thing since we’ll eventually start connecting these boxes together.
To be completely pedantic, the major chord shape shown with box 3 isn’t really playable as a chord for most people. In practice, you’ll probably think of it as an arpeggio. You can play it as a power chord (5 chord) if you leave out the top string. (5 chords are neither minor nor major.)
Memorization drills
This post is already far, far too long. Believe it or not, I’ve already removed several interesting but ultimately peripheral topics in the interest of brevity.
Rather than include further drills here, I think I’ll leave them to future blog posts.
Here is a rather meandering video to give you some idea of how to actually make headway with all this stuff, though.